Gaining visibility for your site by ranking well on Search Engine Results Pages (SERPs) is a goal worth pursuing. However, there are probably a few pages on your site that you would rather not direct traffic towards, such as your staging area or duplicate posts.
Fortunately, there’s a simple way to do that on your WordPress site. Using a robots.txt file will steer search engines (and therefore visitors) away from any content you want to hide, and can even help to bolster your Search Engine Optimization (SEO) efforts.
In this post, we’ll help you understand what a robots.txt file is and how it relates to your site’s SEO. Then we’ll show you how to quickly and easily create and edit this file in WordPress, using the Yoast SEO plugin. Let’s dive in!
An Introduction to robots.txt
In a nutshell, robots.txt is a plain text file that’s stored in a website’s main directory. Its function is to give instructions to search engine crawlers before they explore and index your website’s pages.
In order to understand robots.txt, you need to know a bit about search engine crawlers. These are programs (or ‘bots’) that visit websites to learn about their content. How crawlers index your site’s pages determines whether they end up on SERPs (and how highly they rank).
When a search engine crawler arrives at a website, the first thing it does is check for a robots.txt file in the site’s main directory. If it finds one, it will take note of the instructions listed within, and follow them when exploring the site.
If there isn’t a robots.txt file, the bot will simply crawl and index the entire site (or as much of the site as it can find). This isn’t always a problem, but there are several situations in which it could prove harmful to your site and its SEO.
Why robots.txt Matters for SEO
One of the most common uses of robots.txt is to hide website content from search engines. This is also referred to as ‘disallowing’ bots from crawling certain pages. There are a few reasons you may want to do that.
The first reason is to protect your SERP rankings. Duplicate content tends to confuse search engine crawlers since they can’t list all the copies on SERPs and therefore have to choose which version to prioritize. This can lead to your content competing with itself for top rankings, which is counterproductive.
Another reason you may want to hide content from search engines is to keep them from displaying sections of your website that you want to keep private – such as your staging area or private members-only forums. Encountering these pages can be confusing for users, and it can pull traffic away from the rest of your site.
In addition to disallowing bots from exploring certain areas of your site, you can also specify a ‘crawl delay’ in your robots.txt file. This will prevent server overloads caused by bots loading and crawling multiple pages on your site at once. It can also cut down on Connection timed out errors, which can be very frustrating for your users.
How to Create and Edit robots.txt in WordPress (In 3 Steps)
Fortunately, the Yoast SEO plugin makes it easy to create and edit your WordPress site’s robots.txt file. The steps below will assume that you have already installed and activated Yoast SEO on your site.
Step 1: Access the Yoast SEO File Editor
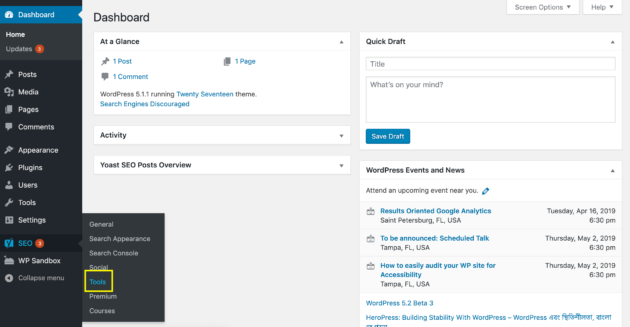
One way to create or edit your robots.txt file is by using Yoast’s File Editor tool. To access it, visit your WordPress admin dashboard and navigate to Yoast SEO > Tools in the sidebar:

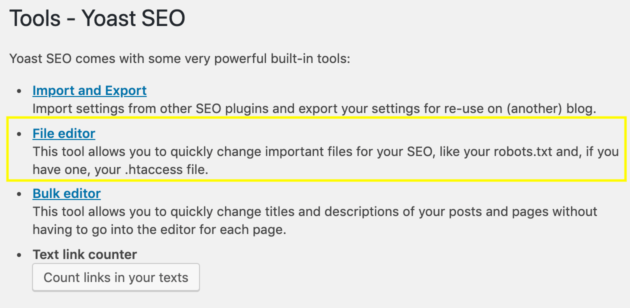
On the resulting screen, select File Editor from the list of tools:

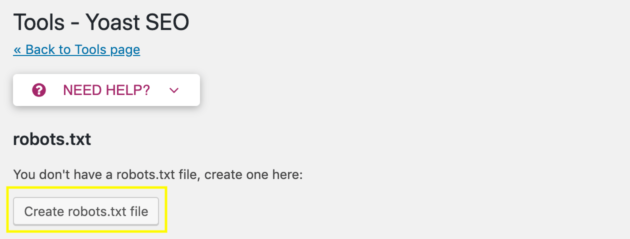
If you already have a robots.txt file, this will open a text editor where you can make changes to it. If you don’t have a robots.txt file, you’ll see this button instead:

Click on it to automatically generate a robots.txt file and save it to your website’s main directory. There are two benefits to setting up your robots.txt file this way.
First, you can be sure the file is saved in the right place, which is essential for ensuring that search engine crawlers can find it. The file will also be named properly, in all lower case. This is important because search engine crawlers are case sensitive, and will not recognize files with names such as Robots.txt.
Step 2: Format Your robots.txt File
In order to communicate effectively with search engine crawlers, you’ll need to make sure your robots.txt file is formatted correctly. All robots.txt files list a ‘user-agent’, and then ‘directives’ for that agent to follow.
A user-agent is a specific search engine crawler you want to give instructions to. Some common ones include: bingbot, googlebot, slurp (Yahoo), and yandex. Directives are the instructions you want the search engine crawlers to follow. We’ve already discussed two kinds of directives in this post: disallow and crawl delay.
When you put these two elements together, you get a complete robots.txt file. It can be as short as just two lines. Here’s our own robots.txt file as an example:

You can find more examples by simply typing in a site’s URL followed by /robots.txt (e.g., example.com/robots.txt).
Another important formatting element is the ‘wild card.’ This is a symbol used to indicate multiple search engine crawlers at once. In our robots.txt file above, the asterisk (*) stands in for all user-agents, so the directives following it will apply to any bot that reads them.
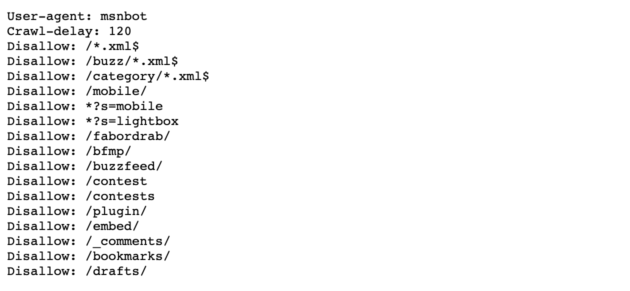
The other commonly-used wild card is the dollar ($) symbol. It can stand in for the end of a URL, and is used for giving directives that should apply to all pages with a specific URL ending. Here’s BuzzFeed’s robots.txt file as an example:

Here, the site is using the $ wild card to block search engine crawlers from all .xml files. In your own robots.txt file, you can include as many directives, user-agents, and wild cards as you like, in whatever combination best suits your needs.
Step 3: Use robots.txt Commands to Direct Search Engine Crawlers
Now that you know how to create and format your robots.txt file, you can actually start giving instructions to search engine bots. There are four common directives you can include in your robots.txt file:
- Disallow. Tells search engine crawlers not to explore and index the specified page or pages.
- Allow. Enables the crawling and indexing of subfolders that are disallowed by a previous directive. This command only works with Googlebot.
- Crawl Delay. Instructs search engine crawlers to wait for a specified period of time before loading the page in question.
- Sitemap. Gives search engine crawlers the location of a sitemap that provides additional information, which will help the bots crawl your site more effectively. If you choose to use this directive, it should be placed at the very end of your file.
None of these directives are strictly required for your robots.txt file. In fact, you can find arguments for or against using any of them.
At the very least, there’s no harm in disallowing bots from crawling pages you absolutely do not want on SERPs and pointing out your sitemap. Even if you’re going to use other tools to handle some of these tasks, your robots.txt file can provide a backup to make sure the directives are carried out.
Conclusion
There are many reasons you may want to give instructions to search engine crawlers. Whether you need to hide certain areas of your site from SERPs, set up a crawl delay, or point out the location of your sitemap, your robots.txt file can get the job done.
To create and edit your robots.txt file with Yoast SEO, you’ll want to:
- Access the Yoast SEO File Editor.
- Format your robots.txt file.
- Use robots.txt commands to direct search engine crawlers.
Do you have any questions about using robots.txt to improve your SEO? Ask away in the comments section below!
Image credit: Pexels.
The post Understanding robots.txt: Why It Matters and How to Use It appeared first on Torque.
