As we’ve established before, WordPress is an inherently secure platform. However, that doesn’t make it free from problems. You may sometimes come across issues that can be frustrating to deal with, especially if they don’t give you a lot of information about their causes.
The Error Establishing a Database Connection issue is a perfect example. This is one of the most common errors you’ll encounter, and while the name implies the root cause, it still leaves you with little information on how to resolve it. Fortunately, the actual solution is quite simple once you know what you need to do.
In this article, we’ll talk about what causes the Error Establishing a Database Connection problem to occur, and then show you how you can fix it quickly. Let’s get to work!
What the Error Establishing a Database Connection Is (And What Causes It)
When you encounter the Error Establishing a Database Connection message, it usually looks something like this:

Instead of your WordPress site, you see this simple message. When compared to some other common errors, such as the White Screen of Death (WSoD), this at least gives you some information about the underlying problem: your site simply can’t connect to its database.
This is obviously an issue since your database is where all of your site’s content is stored. That includes your posts, media, user information, and so on. The content itself should still be safe and sound, but the site can’t access any of it, so it displays this error instead.
There are several reasons this can happen. For example, the server hosting your database could be down or unavailable, or the credentials your site is using to access the server are incorrect. In rare cases, this error could also be due to networking problems or could occur because your database (or its files) have been corrupted.
Regardless of the root cause, you will need to fix the problem in order to get your site up and running again. We’re going to look at how to do that in the following sections.
How to Fix the Error Establishing a Database Connection (In 3 Steps)
To repair your broken database connection, you will need to become familiar with your site’s wp-config.php file. This is one of the most important core WordPress files, as it’s responsible for how your site connects to its database (among other things).
As such, most instances of the Error Establishing a Database Connection issue can be resolved by editing this file. Let’s walk through how this fix works.
Step 1: Access Your wp-config.php File With Secure File Transfer Protocol (SFTP)
To get started, you will need to access your site’s wp-config.php file, which you can do by using a Secure File Transfer Protocol (SFTP). This essentially connects you directly to an external server in order to access and manage its files. Most hosting plans will include SFTP/FTP credentials (referred to simply as FTP from here on out) that let you access your site’s server to view and edit your files in this way, and other than an extra layer of security, both formats work similarly.
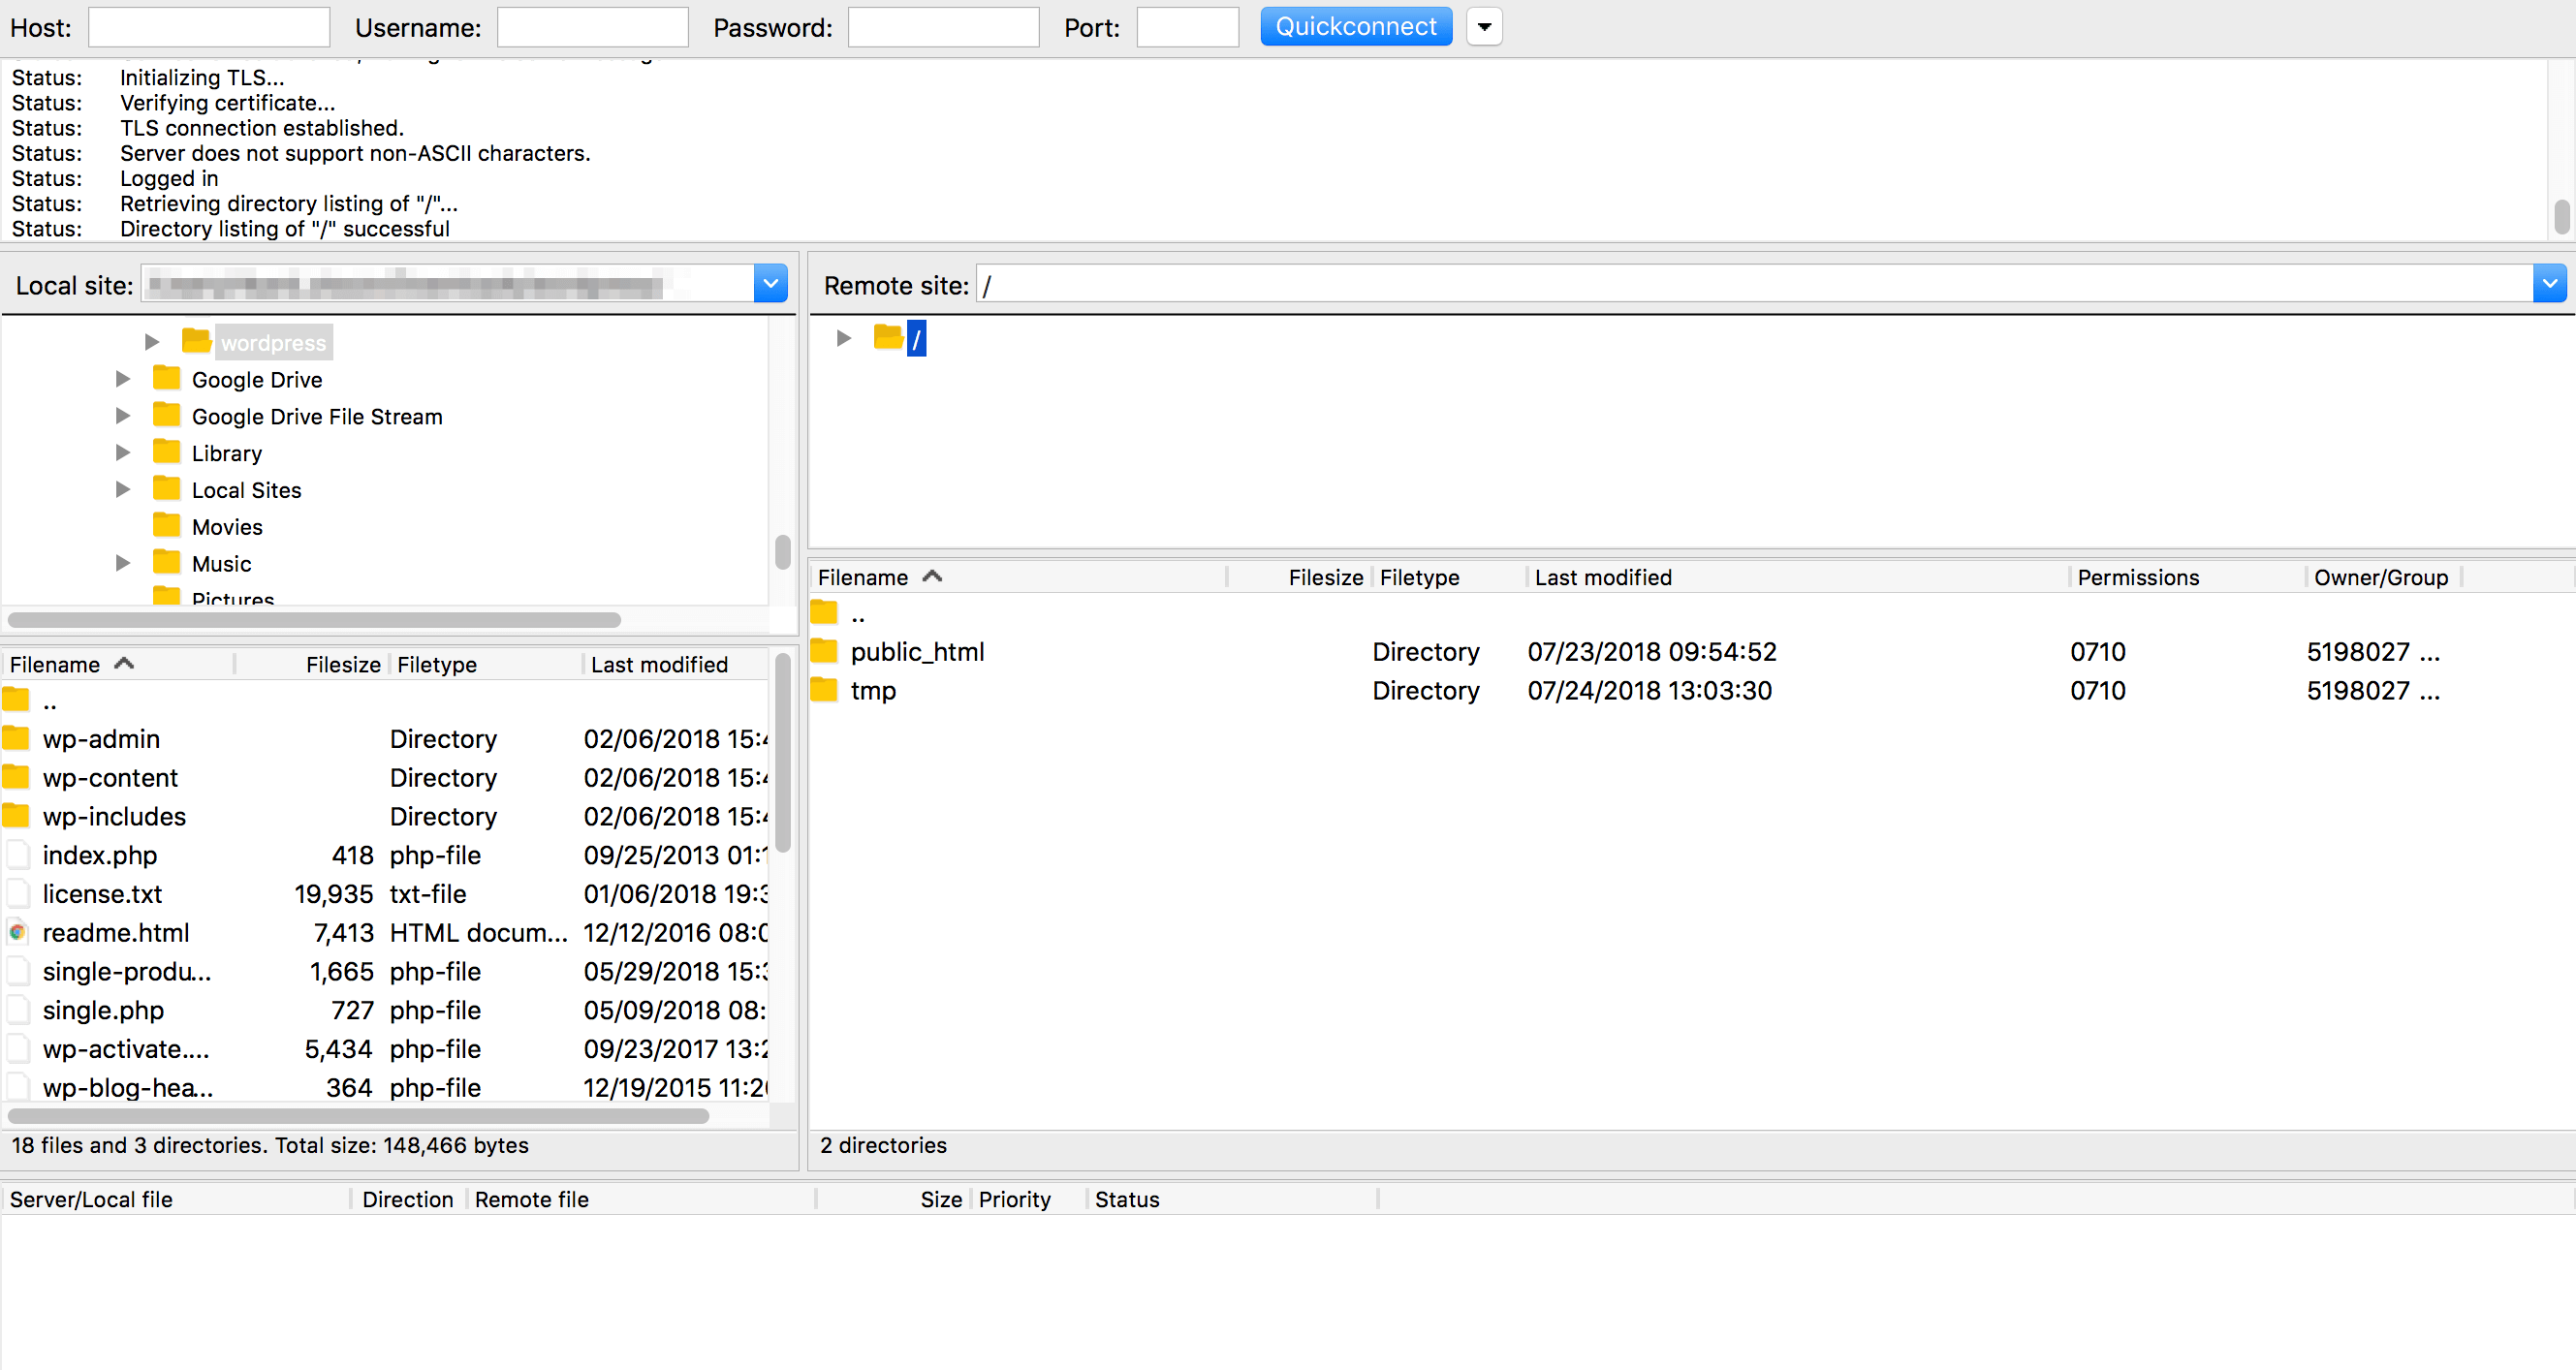
When it comes to using FTP, our recommended solution is FileZilla. This is a free and open-source application that’s also easy to use, even for beginners. Once you’ve downloaded and installed FileZilla, you’ll need to find the FTP credentials provided by your host and use them to connect to your site.
When you’ve done that, you will see your site’s directories listed on the right-hand side of the application:
The wp-config.php file is located in your site’s root directory. The name of that folder can vary depending on your host, but it’s usually called something like root or public_html (or is named after your site’s domain):
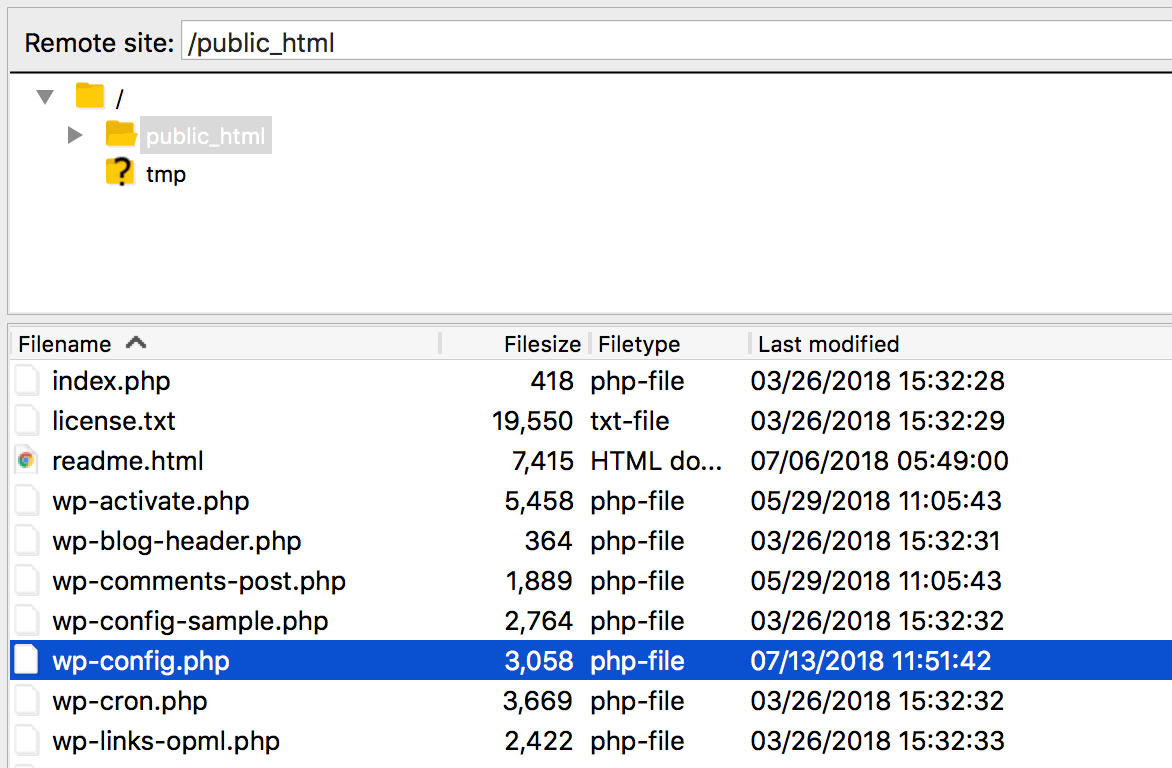
Once you’ve located the right folder, open it up to find wp-config.php. Then, it’s time to take a look inside.
Step 2: Check Your Database Connection Credentials
Next, you’ll want to check that the database connection credentials inside wp-config.php are correct. In some instances, these could become outdated or incorrect. Therefore, it’s important to make sure they match up with those provided by your web host.
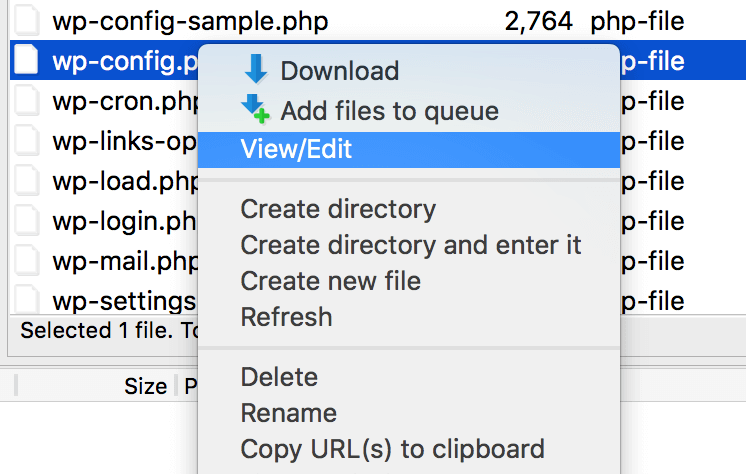
Start by right-clicking on wp-config.php, and selecting View/Edit:
This will open the file in your default text editor:
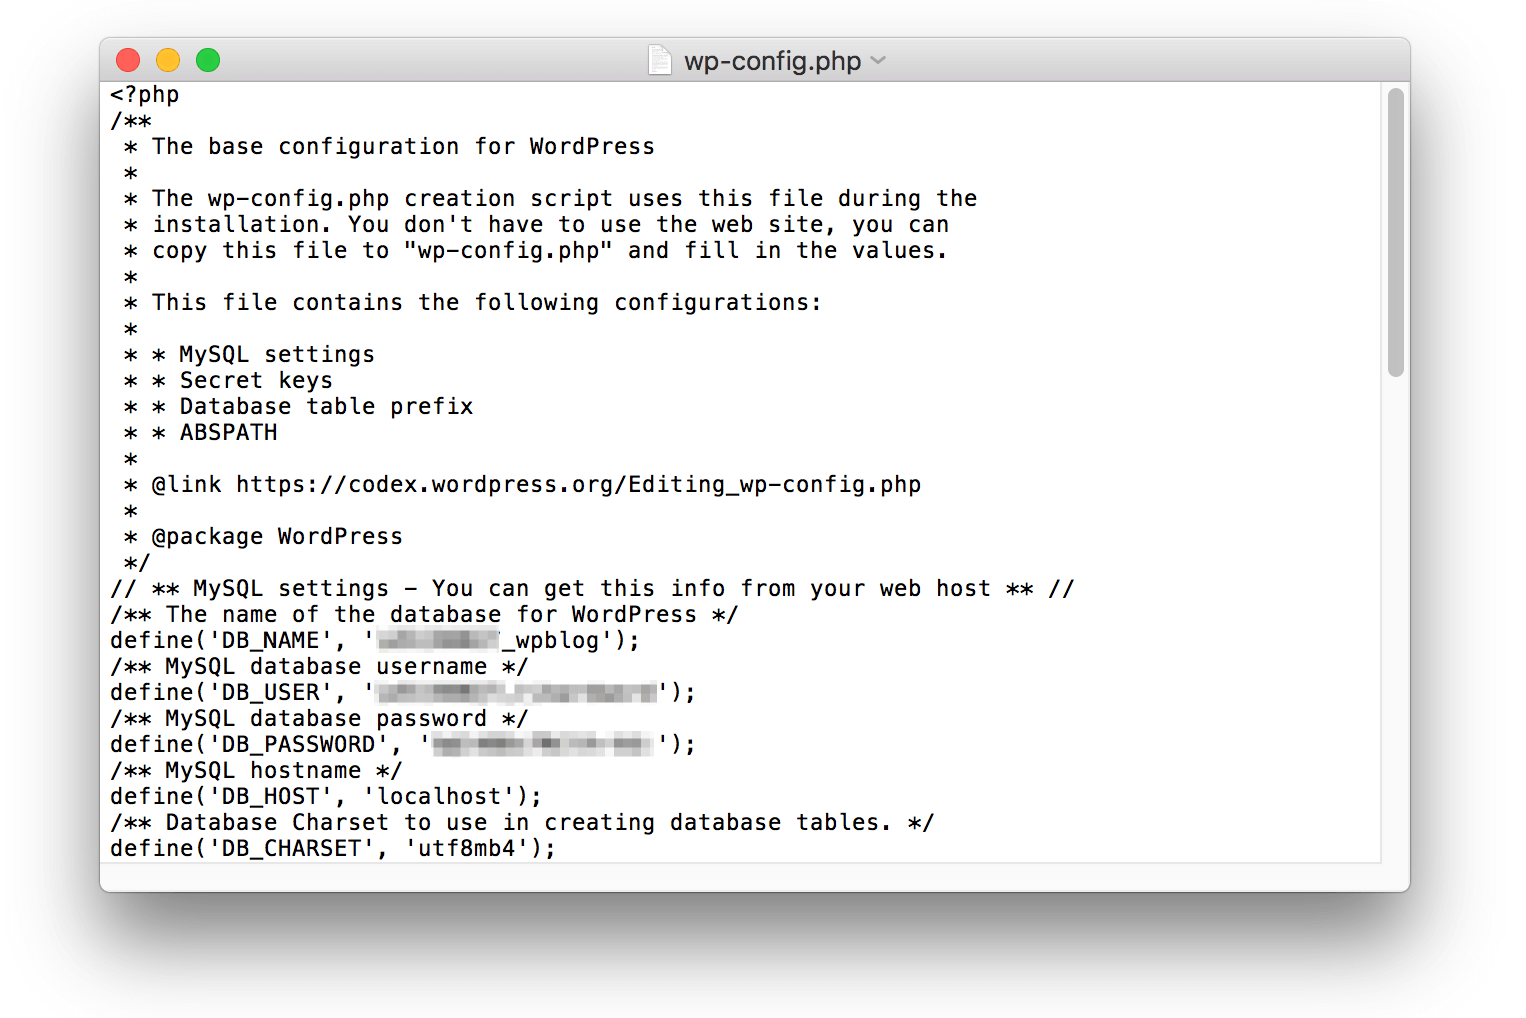
If you’ve not worked with core files before, the contents could seem a little intimidating. However, don’t worry. All you need to pay attention to are these MySQL settings:

You’ll need to make sure that your username, password, hostname, and server name match up with those provided by your web host. To find your MySQL credentials, you’ll need to access your phpMyAdmin.
If the information in wp-config.php does not match what’s in phpMyAdmin, updating it in the file should do the trick. Save the file when you’re done, at which point FileZilla will ask you if you want to override the server’s version:
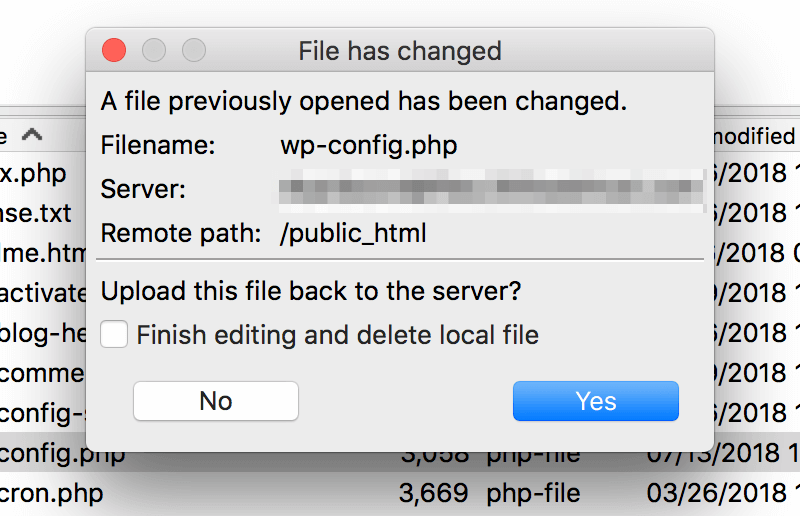
You should select Yes to confirm and save your changes. Then, you can try and access your site again to see if the error still appears. If your site displays normally, you’ve fixed the error!
However, if the credentials were not mismatched, or if the error still occurs even after you update them, you will need to perform one more task.
Step 3: Activate the Automatic Database Optimizing Tool
The automatic database optimizing tool is a slightly hidden, but very useful feature included in WordPress. You can use it to clean up and fix your site’s databases. What’s more, you can activate it from within wp-config.php.
We should mention that once you’ve activated this tool, it can be used by anyone, regardless of whether they’re logged in to your site or not. As such, you should only enable it when necessary, and disable it immediately when you’re finished with it.
To activate the automatic database optimizing tool, make sure you have wp-config.php open and add the following line at the bottom:
define( 'WP_ALLOW_REPAIR', true );
Save your file again, and select Yes when FileZilla asks if you want to upload it back to the server. The tool will now be active. You can access it by navigating to https://yourwebsitesurl.com/wp-admin/maint/repair.php, replacing the placeholder domain with your actual site’s URL.
When you do this, you’ll see the following page:
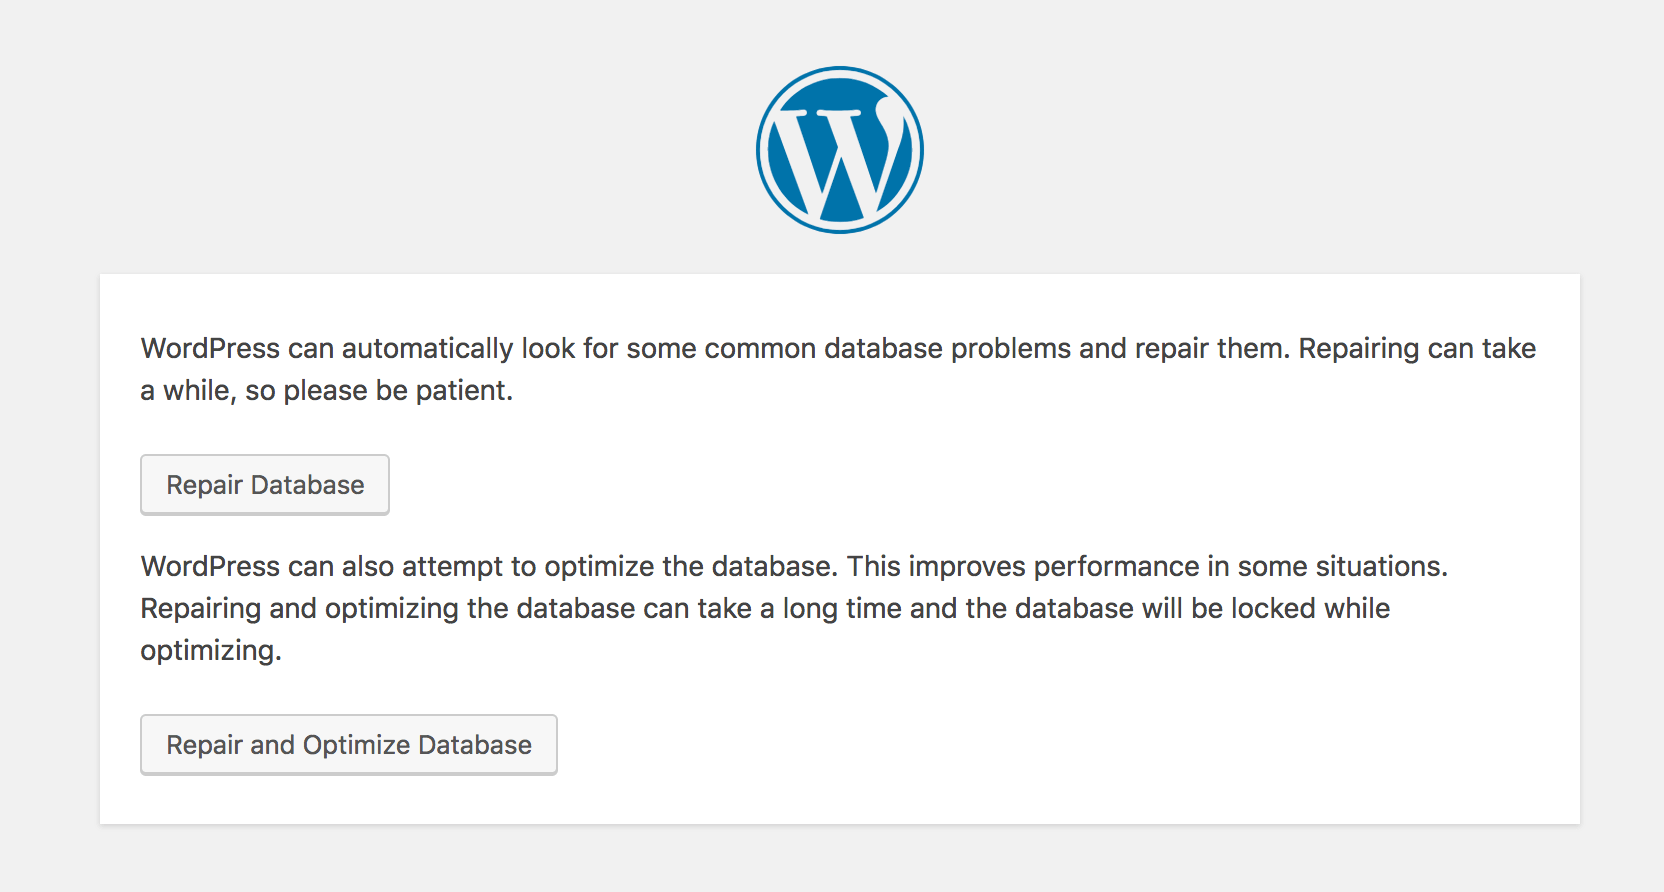
As you can see, there are buttons to Repair Database or to Repair and Optimize Database. You can select either option, which will start the repair tool. This will run for a few moments, and you’ll know it’s done when the page reloads.
At this point, you should see a message letting you know that your databases have been fixed:
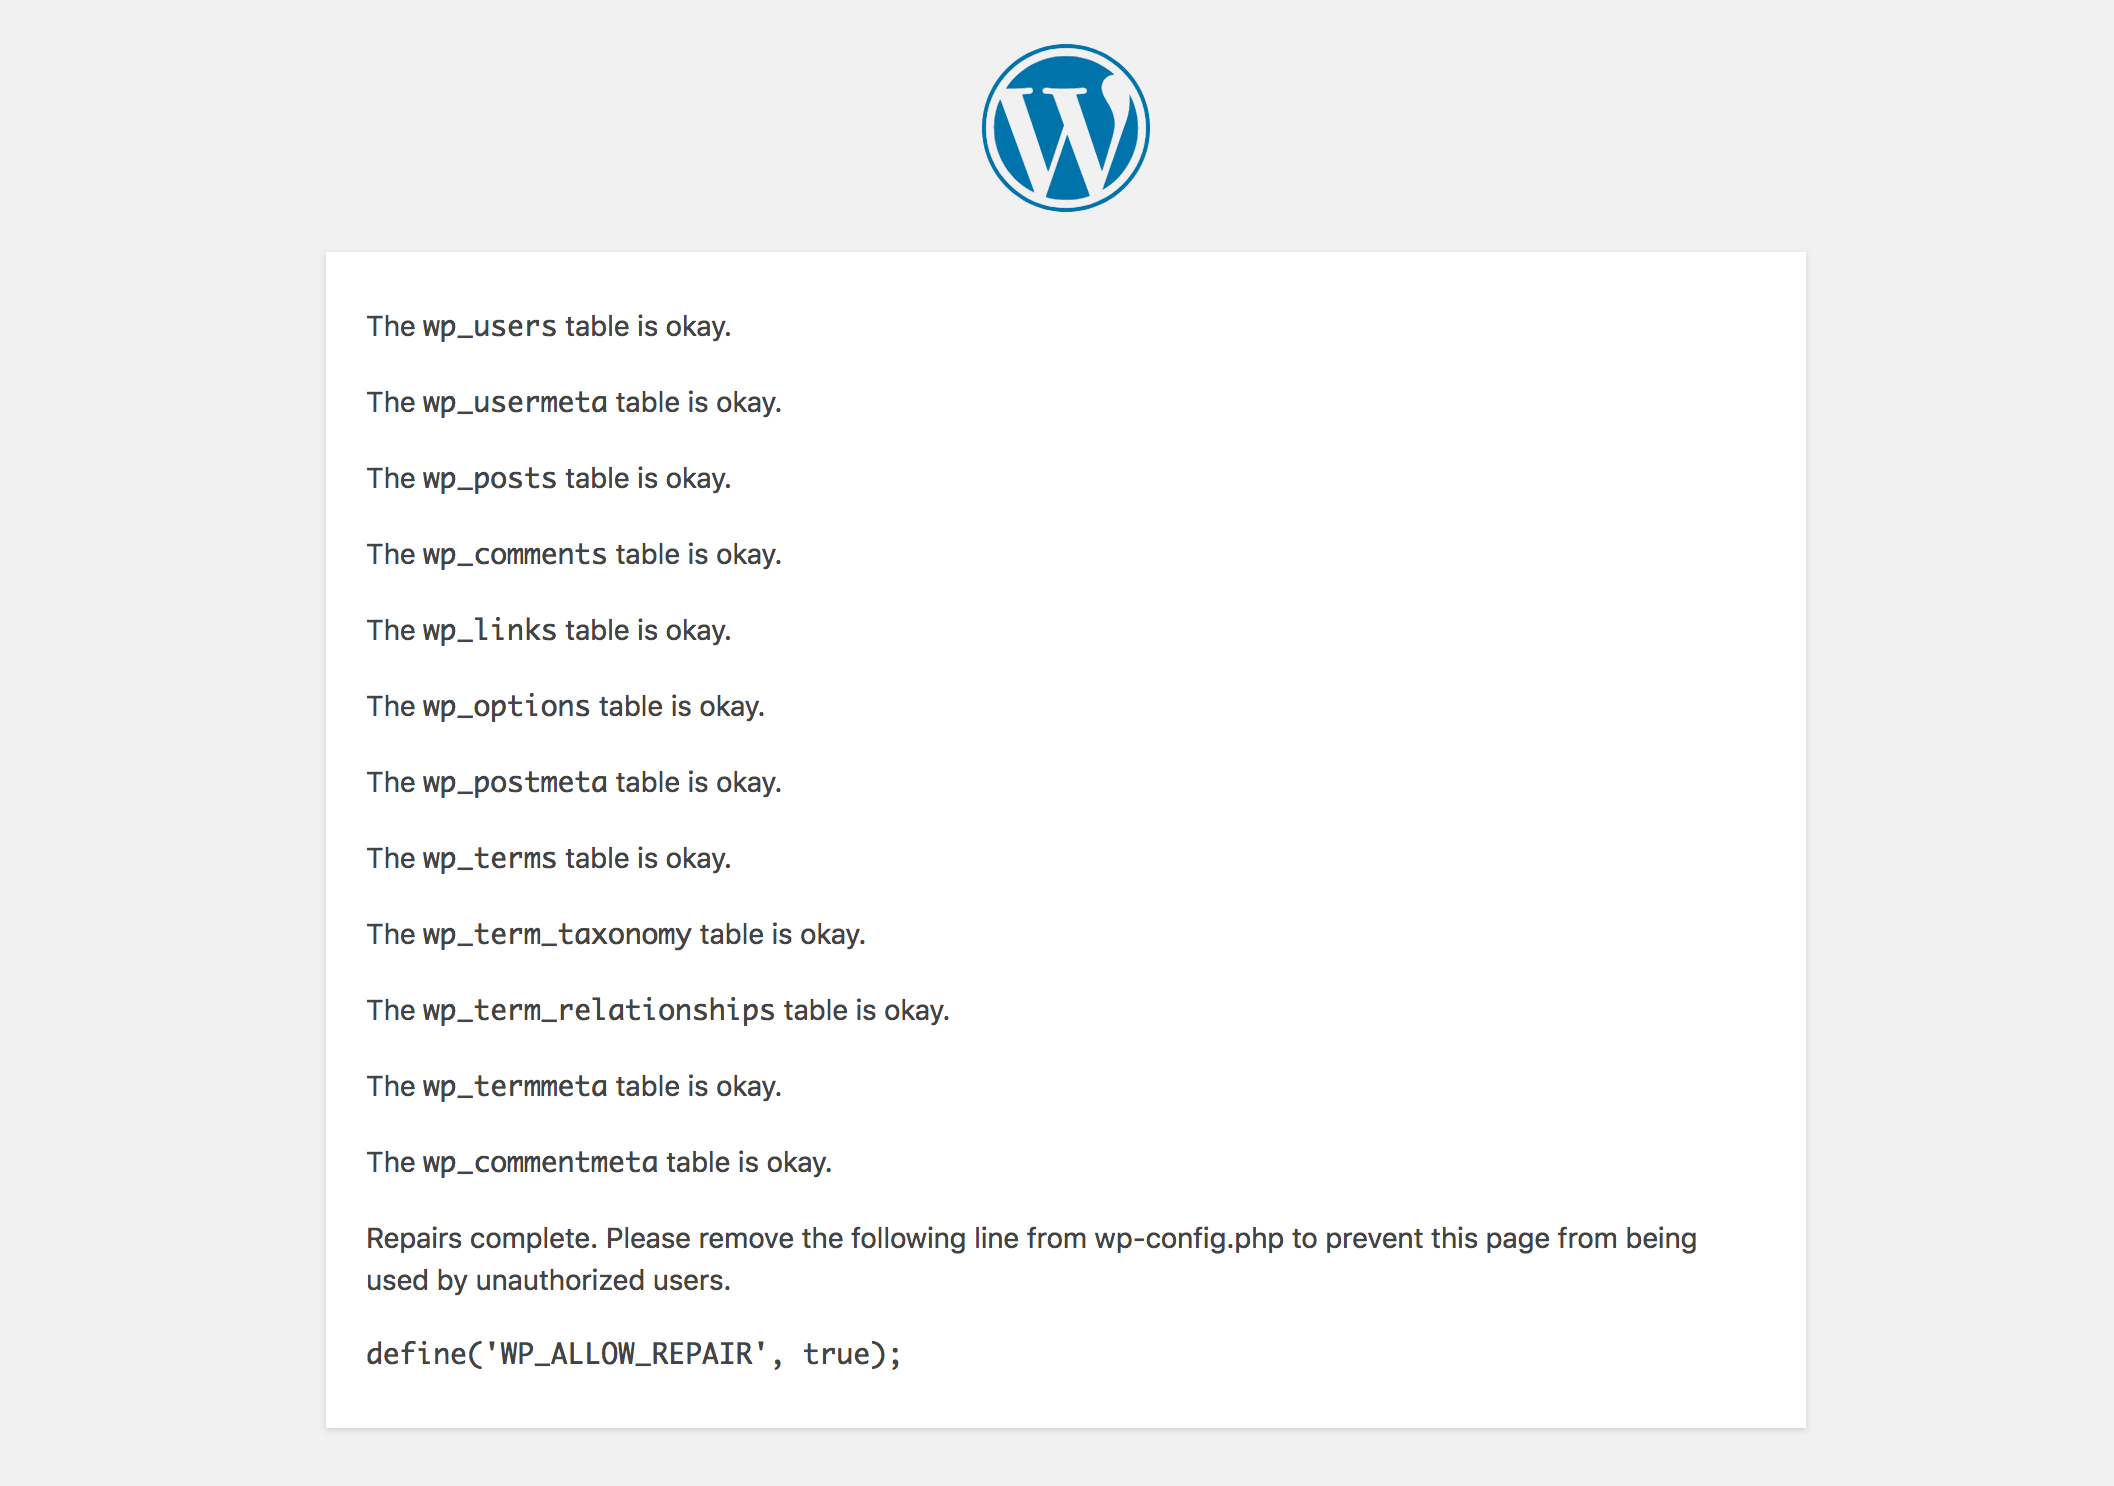
You can now try to access your site again, at which point it should load as expected. If everything appears back to normal, all you need to do is to once again open wp-config.php, and delete the WP_ALLOW_REPAIR line to disable the repair tool.
However, if your site still can’t connect to its database, this issue may simply be beyond your control. Start by checking your host’s current server status, as they may be experiencing problems that are affecting your site. You should also contact your web host’s support team, as they will be able to provide you with more information and assistance.
Conclusion
Seeing your WordPress site replaced with an error is never a fun experience. However, it doesn’t necessarily have to be difficult to deal with. The Error Establishing a Database Connection issue is one of the more common problems facing WordPress users. Fortunately, it’s relatively easy to fix once you understand its causes.
In this article, we’ve taken you through the process of fixing a database connection error. All you need to do to get your site up and running again is follow these three steps:
- Access your wp-config.php file via FTP.
- Check your database connection credentials.
- Activate the automatic database optimizing tool.
Do you have any questions about the Error Establishing a Database Connection issue? Let us know in the comments section below!
Image credit: Pixabay.
The post Error Establishing a Database Connection: What It Is and How to Fix It appeared first on Torque.
