Buying or renting a property is stressful. One of the hardest parts is finding the best one for you. A real estate website which makes it easy for you to discover your dream home will make things a lot easier.
The good news is that building a real estate website which not only looks good but works great is easier than you think.
Below I’ll show you how I created the main features you’ll need for a real estate website. I created them all using Toolset Real Estate.
- Custom post types for your houses and estate agents
- Custom fields for the house descriptions
- Taxonomies to separate your properties
- Templates to help you display your properties
- Maps to display each house’s location
- Post-relationships to make it easy for users to know which estate agent to contact for a viewing
- A search to ensure users can find the property they want
- A slider to show images of different properties
- Front-end forms for users to submit their own listings
While following the steps below you can download your own WordPress test site which contains all of the real estate features for you to practice on.
Let’s get started!
How to create your custom post type
Custom post types allow you to create different sections on your website. WordPress by default only provides “Posts” and “Pages.” Obviously, it does not make sense to list your houses for sale here.
That’s why we can use custom post types to create sections for our “Houses” and our “Estate Agents” among others.
Below we’ll show you how to create your “Houses” custom post type.
- Head to Toolset -> Post Types and click Add New.
- Under Name and description, give a name to your custom post type as I did below:
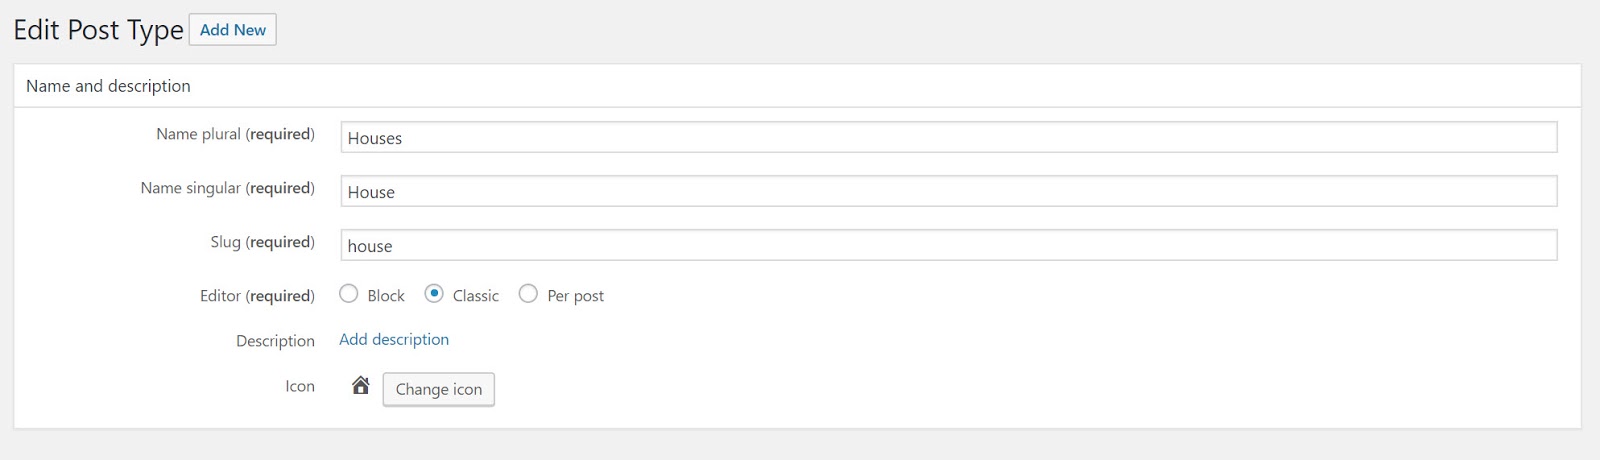
3. Click Save post type and your custom post type is ready.
How to create the custom fields for your houses
Custom fields are an essential tool for a real estate website which enables you to add customized information to each of your posts.
For example, for our houses, we’ll want to create fields which allow users to add the price, when it was built, the size of the property and many more fields.
Here’s how to add your custom fields for your houses.
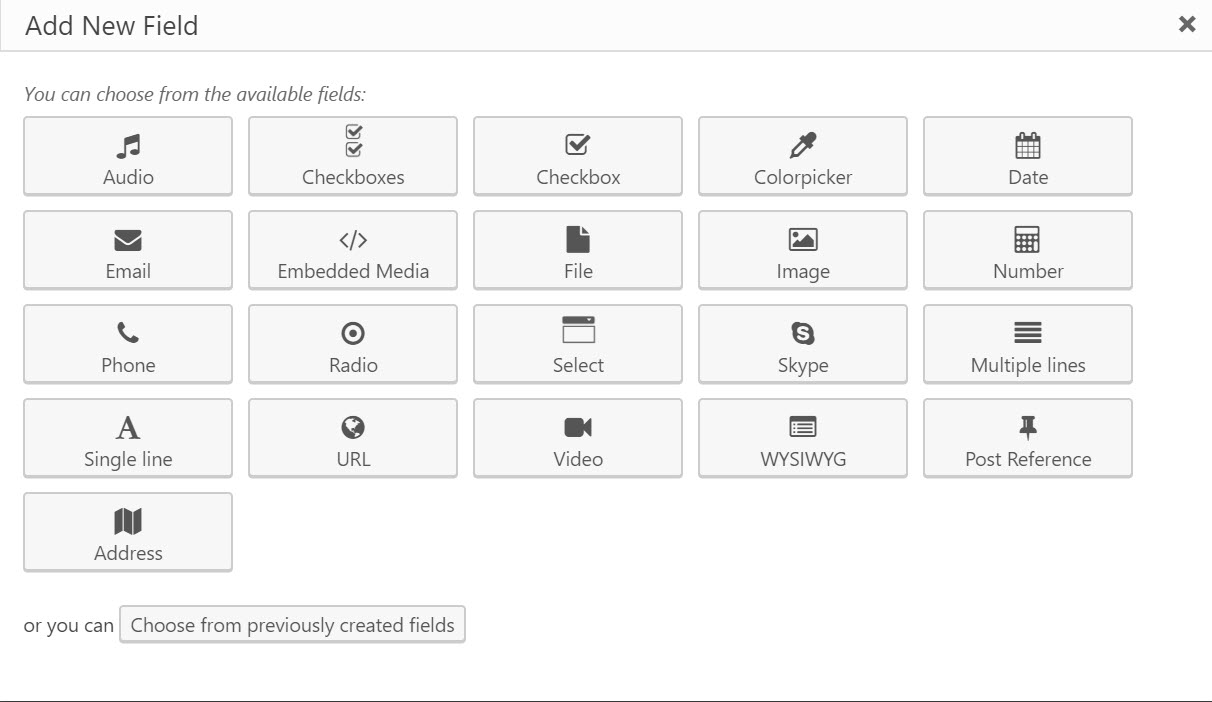
- Head to Toolset -> Dashboard and under the “Houses” post-click Add custom fields.
- Select the type of field you want to add. For example, if you wanted to add a field for the year a house was built you’d need the Number field.
3. Add in the information for your custom field including the name, whether you want a default value and whether it’s required to fill in the field.
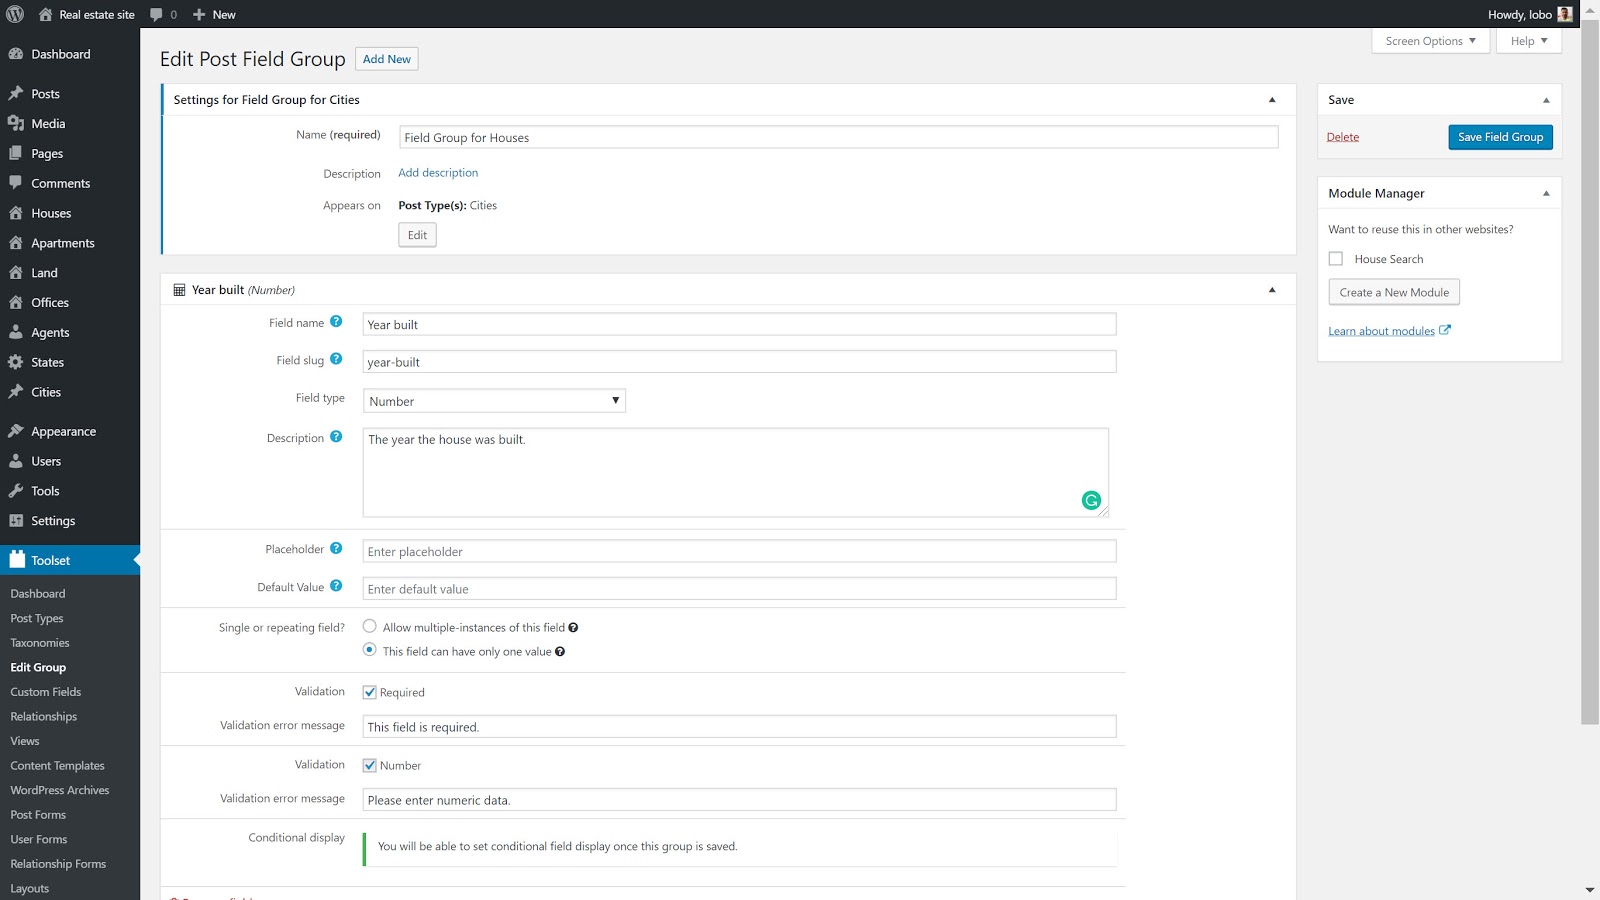
4. Name your custom field at the top of the page.
5. To add more fields click Add New Field at the bottom and repeat the previous steps.
6. Once you are finished click Save Field Group in the top right-hand corner of the screen.
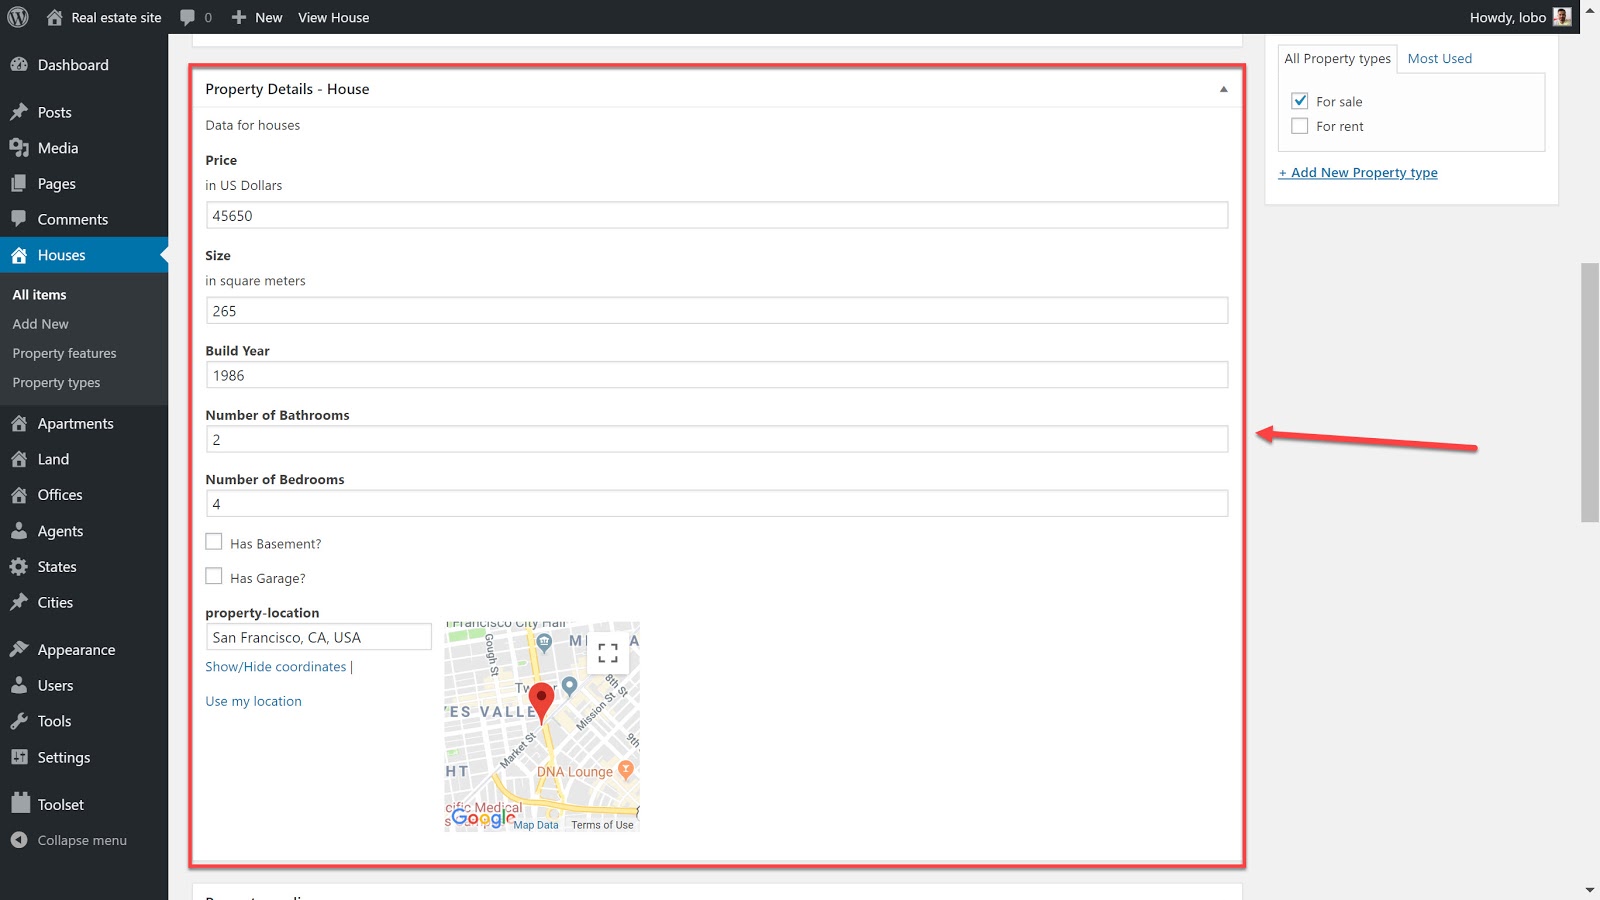
You can now fill in your custom fields when you head to the post editor to edit any of your houses.
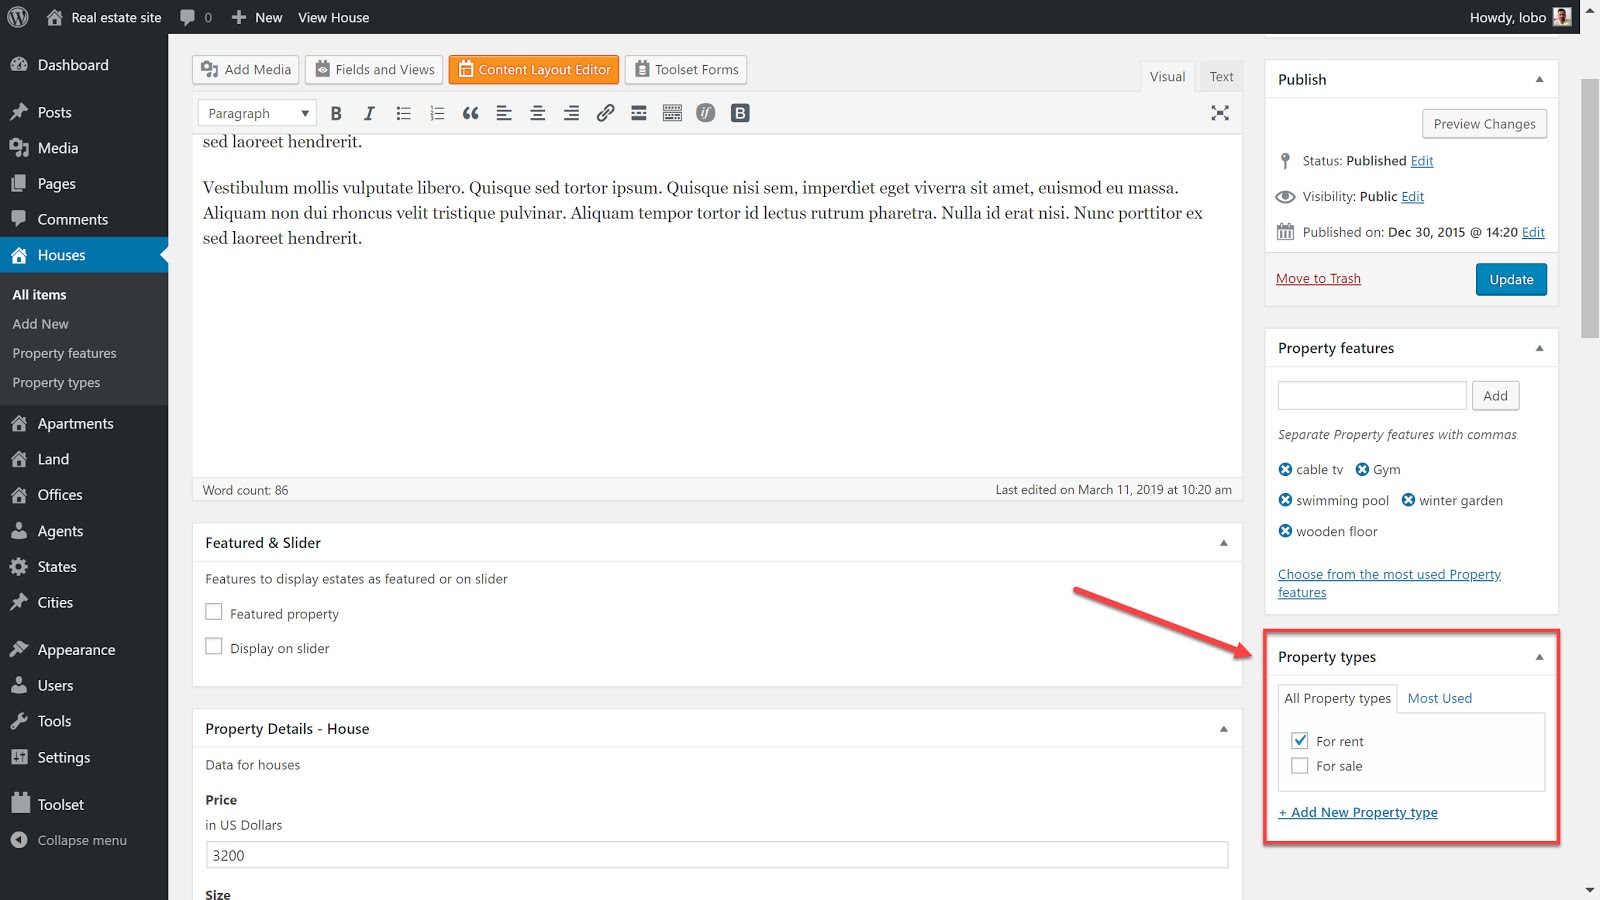
How to create the taxonomies to categorize your houses
Taxonomies help you split your houses up into categories based on their features.
When a buyer is searching for a house they usually have an idea of what type of house they’re looking for. It could be a house with three or more bedrooms, a house with a large garden or a bungalow with two bathrooms. Custom taxonomies let you split your houses up exactly how you want.
Below is how I created the custom taxonomies for my “houses” custom post type to show whether houses are for sale or for rent.
- Head to Toolset -> Dashboard and click Add custom taxonomy.
- Name your taxonomy as I did:
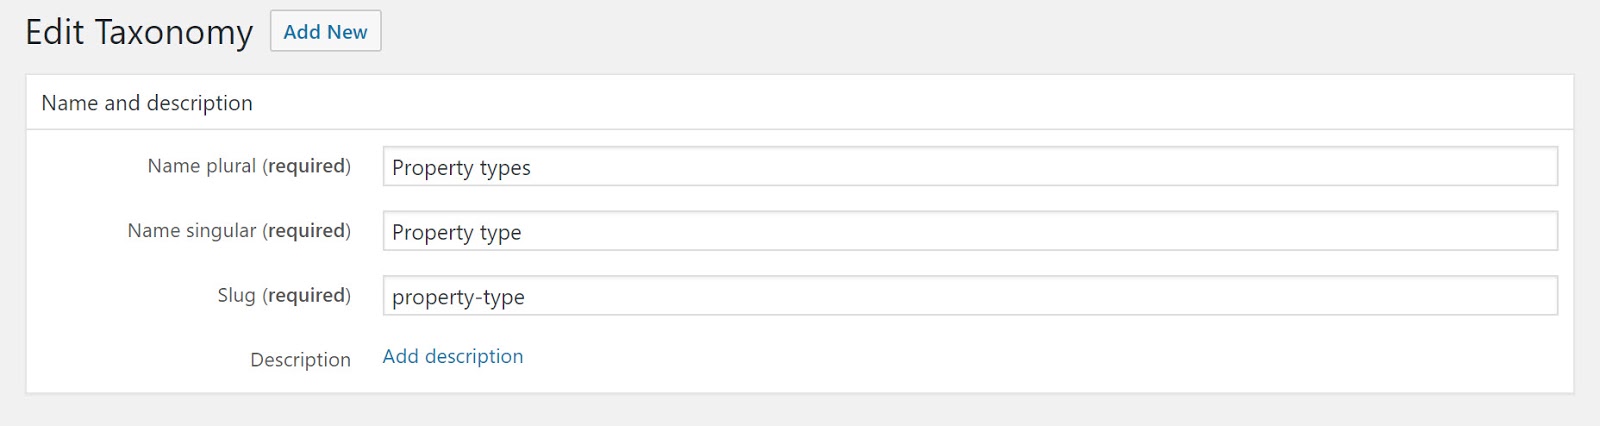
3. Choose whether you want a hierarchical or flat taxonomy. I’ve made mine hierarchical in case I want to add different categories under my “for sale” and “for rent” taxonomies.
4. Select the post type you want to use the taxonomy on.
5. Click Save taxonomy.
Now when I edit a “Houses” post type I will be able to add and checkboxes for different taxonomies.
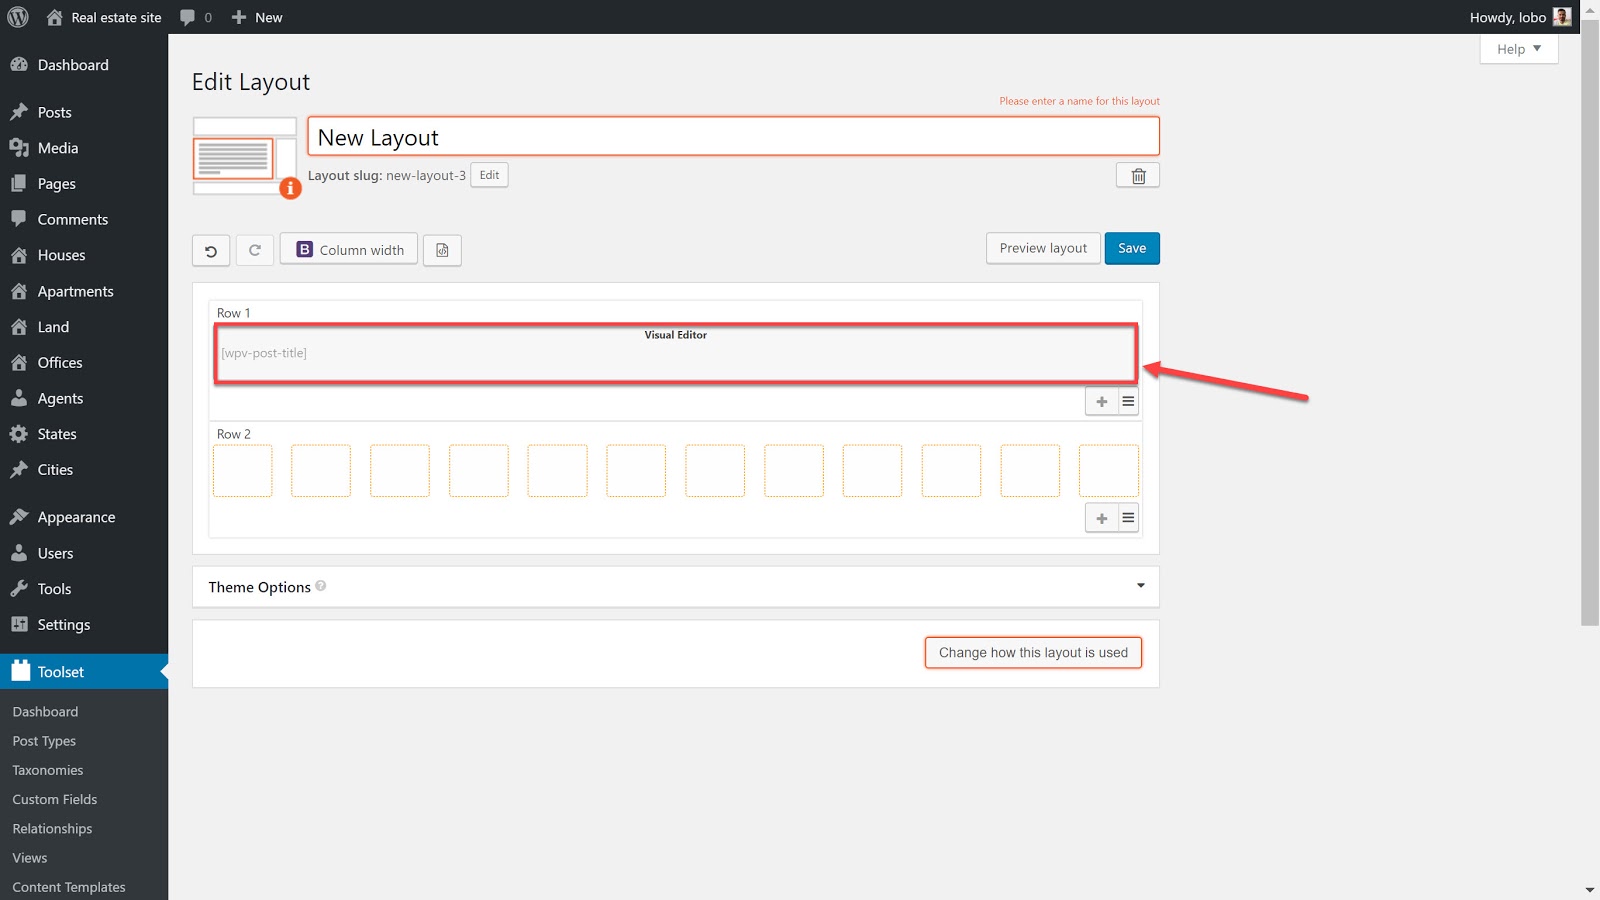
4. How to create a template to display properties
Now that we have created our content we now need to display it on the front-end. The easiest way is to create a template which we can use for every individual house.
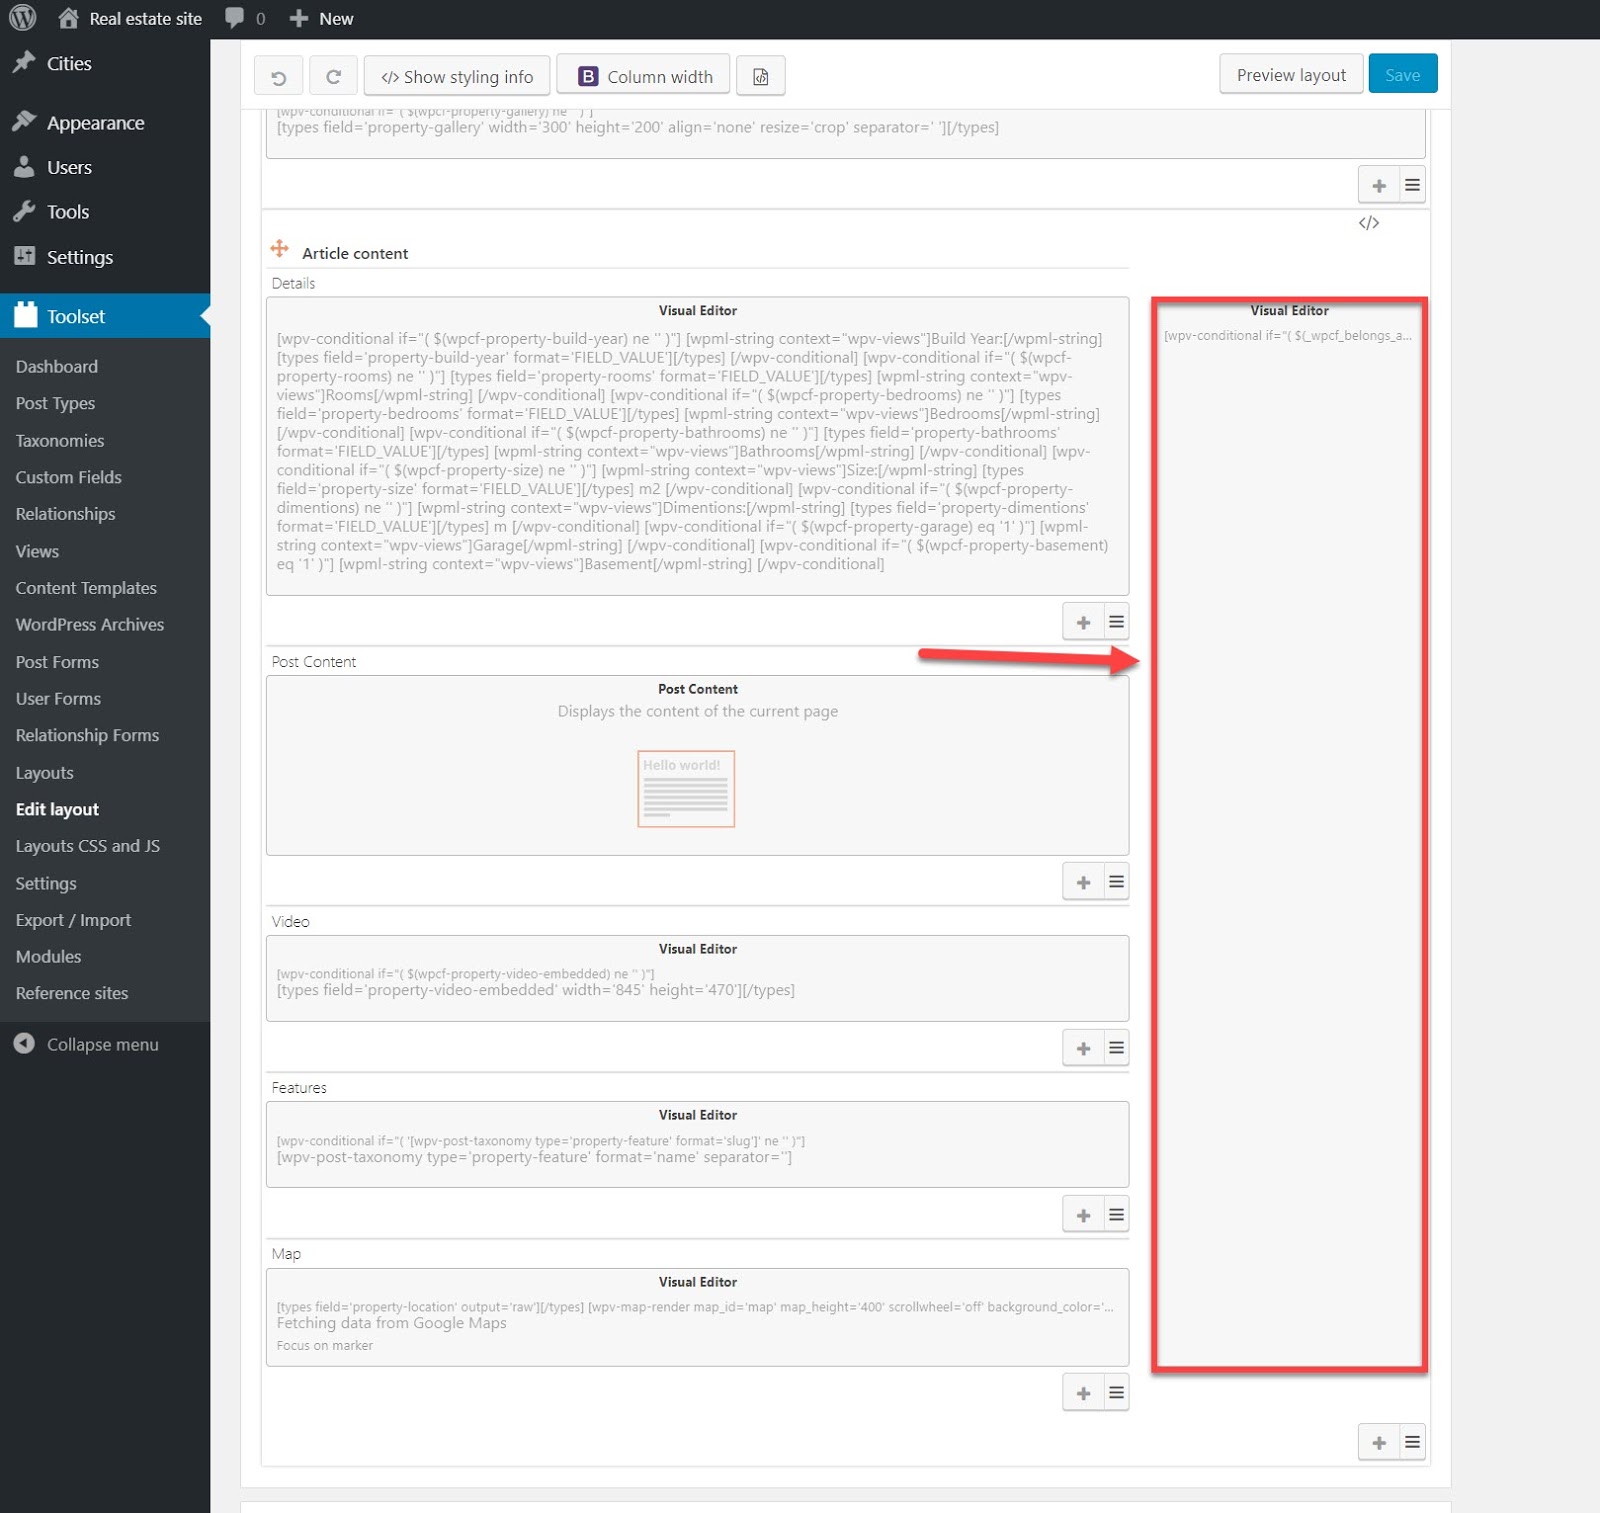
I used Toolset’s drag and drop editor, Layouts, to build my template. This template’s design is what users will see when they click on any of the houses.
When you use Layouts there are different types of cells which you can insert to display different types of content. For your real estate
- Post Content – To add any content which comes from the post body.
- Visual Editor – To add brand new text or shortcodes for custom content.
Now, let’s create a section which will display our custom fields on all of our “Houses” post types.
- Go to Toolset -> Dashboard and click Create Template next to the “Houses” post type.
- You will now be taken to the Toolset Layouts editor where you can design the structure of your page. Here you can decide where information goes and how large it appears on the page. For example, I want the post title to cover the whole page so I’ve selected that it takes up all nine cells in the row.
3. Let’s create a cell for our custom fields. I clicked the + icon to add another row to my layout. Decide how many cells you want it to take up and click to open up the editor.
4. Select the Visual Editor.
5. Click on Fields and Views and scroll down until you find your set of custom fields to add. Mine is called Property details – House. Select all of the fields you want to appear for the houses.
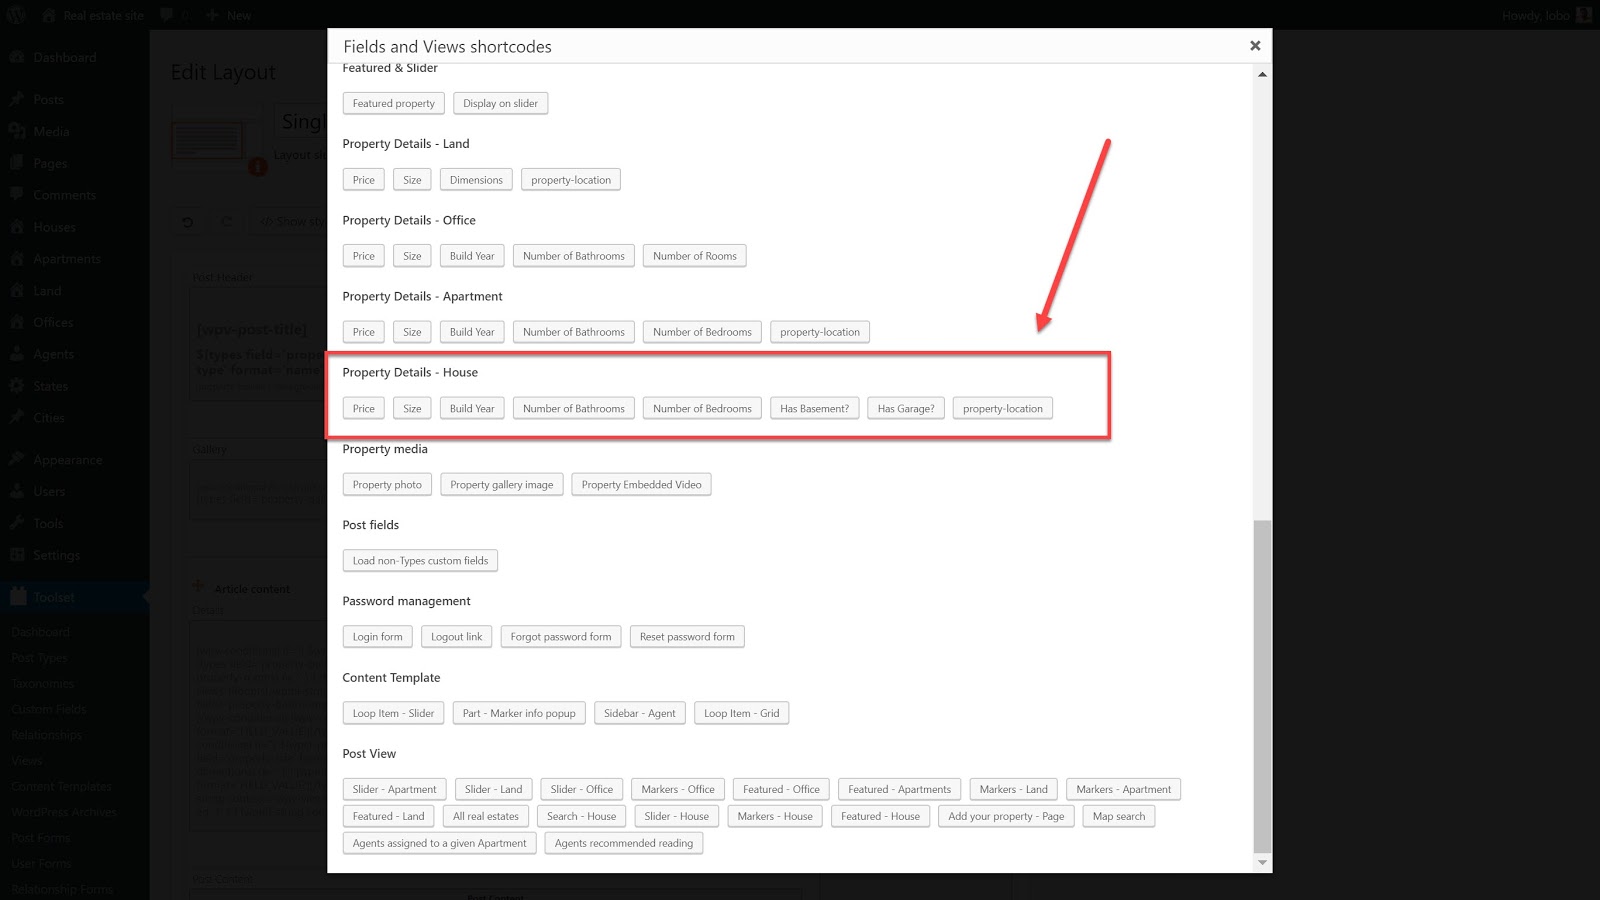
6. Click Insert Shortcode for each of the custom fields you want to add.
7. When we look in the editor cell we can now see all of the shortcodes which will appear. You can also add any additional custom styling as well.
I added some further cells for maps, my agent post type, and taxonomies which you can see below.
I’ll go through how I added some of these features. First, let’s look at maps.
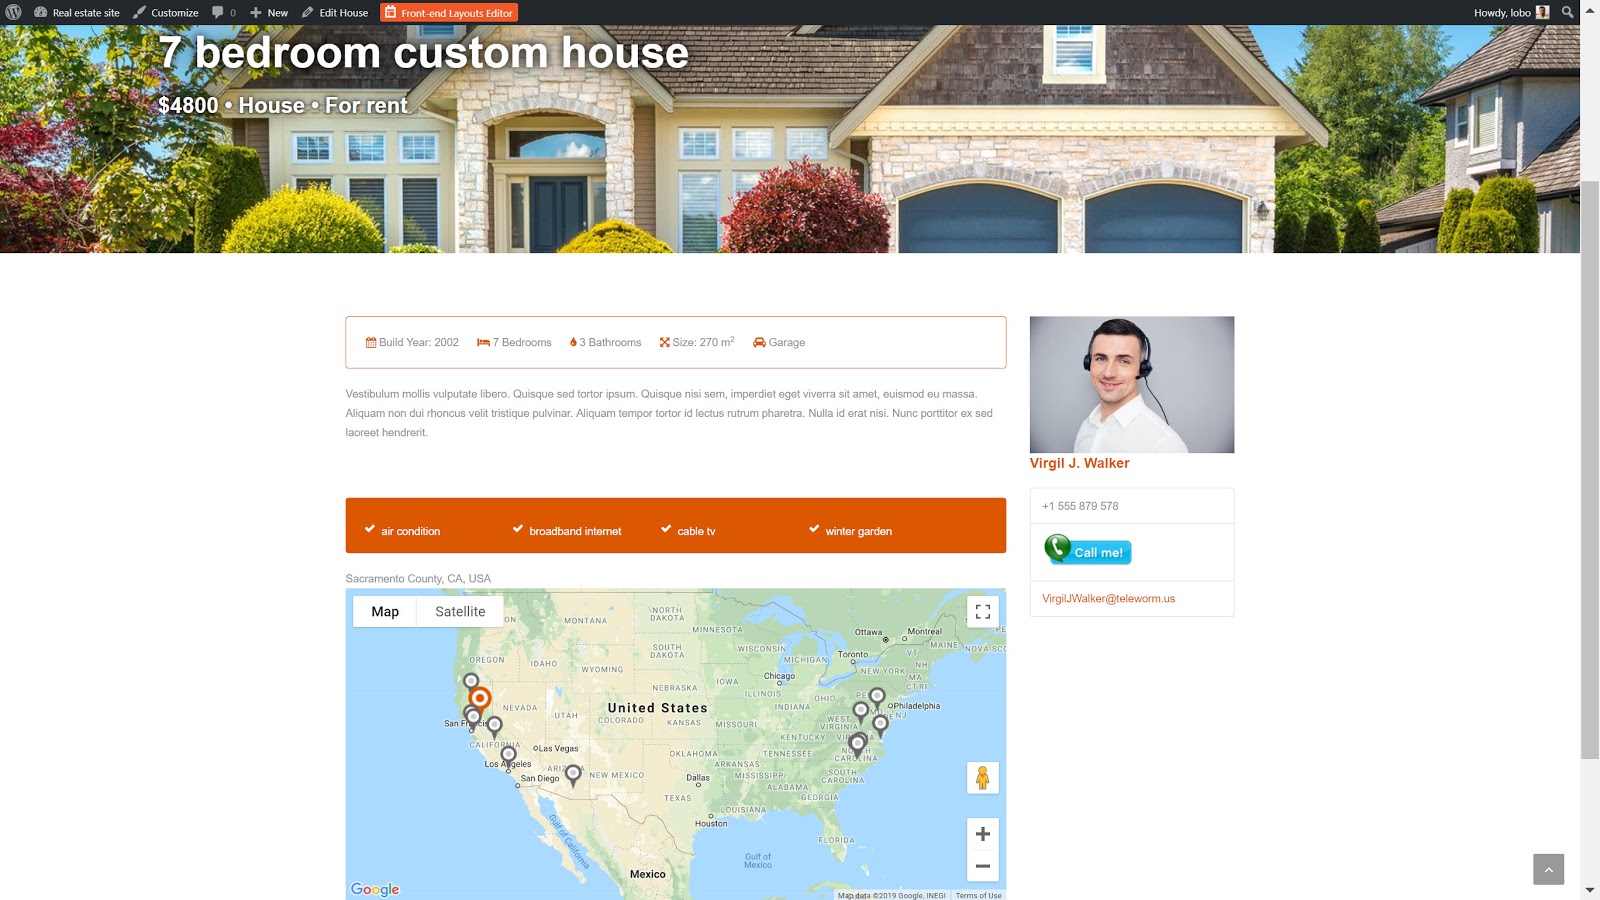
5. How to create and display maps of your properties
A map is a great way to let your user understand exactly where a property is located. Not only that, but it adds variety to a page which can get bogged down by text.
Create your map
- I want to display my maps in the same template I created above so I created a new Visual Editor cell. You can, of course, add your maps to any page or template.
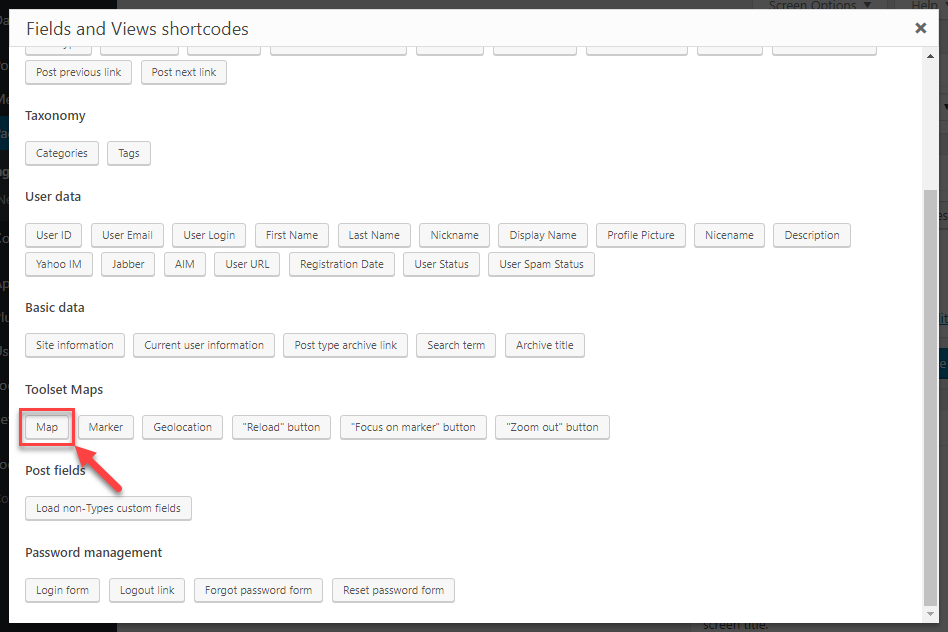
- Click Fields and Views and select and insert the Map shortcode.
- Now it’s time to focus the map on the location we want. Set zoom center and center manually and enter the coordinates for your location.
- Click Insert shortcode.
Add the map marker
Once we’ve added our maps shortcode we still need the marker that will highlight the exact location on the map. This shortcode will go in the same cell as the one for maps.
- Click on Fields and Views.
- Click Marker.
- Under Source of the marker, select A post field storing an address and choose property location.
- Click Insert shortcode.
- Check that the map_id is the same for both the marker and map shortcodes.
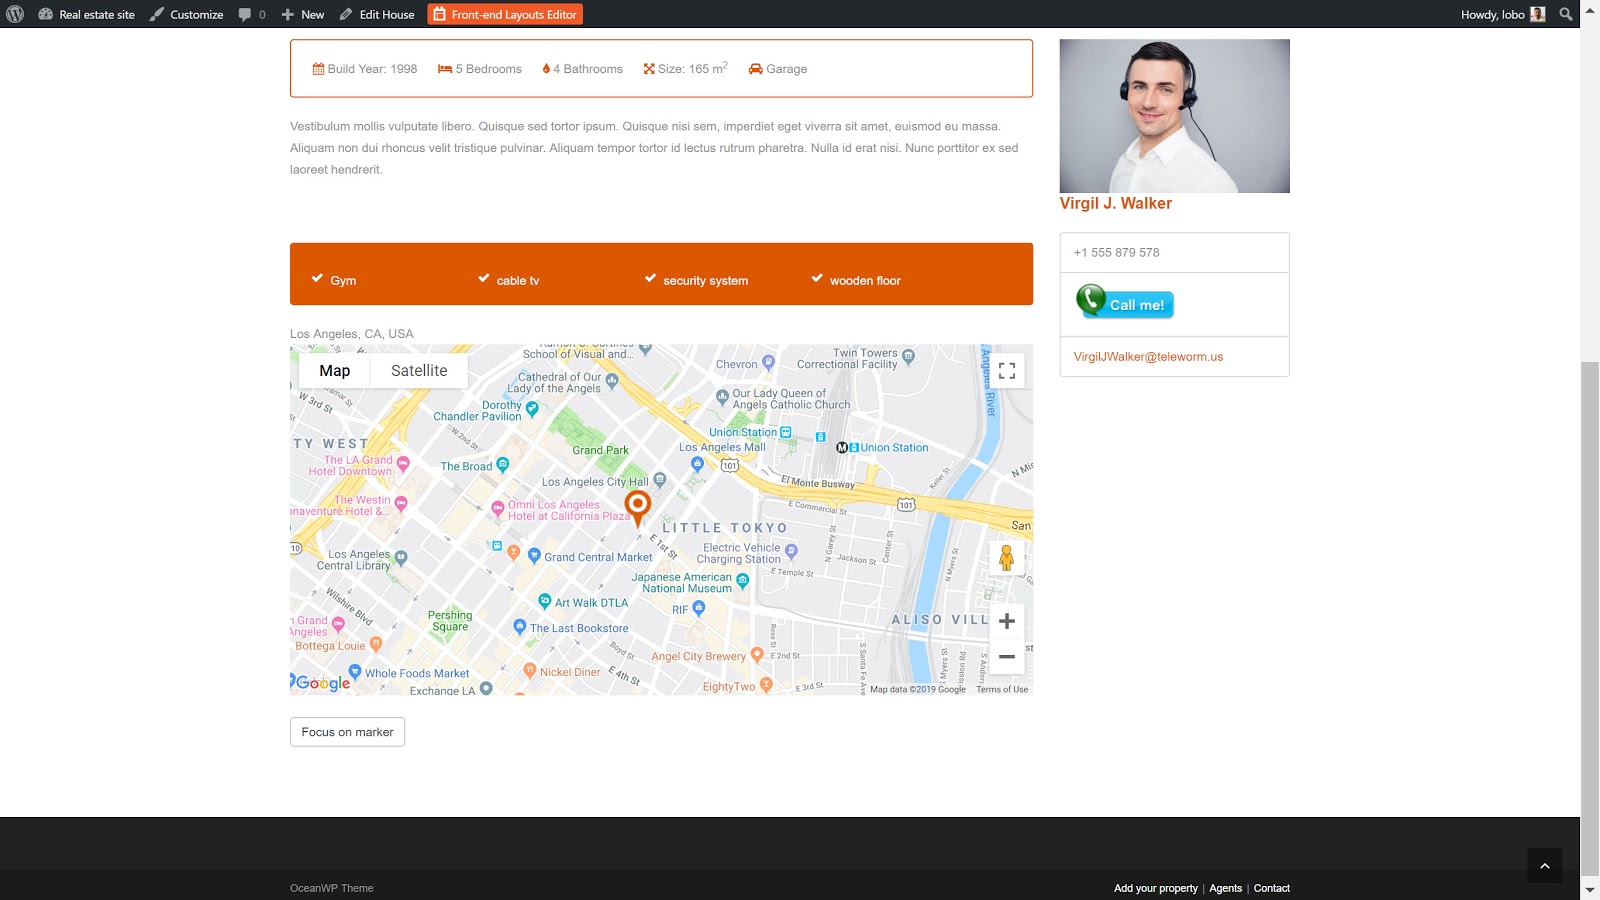
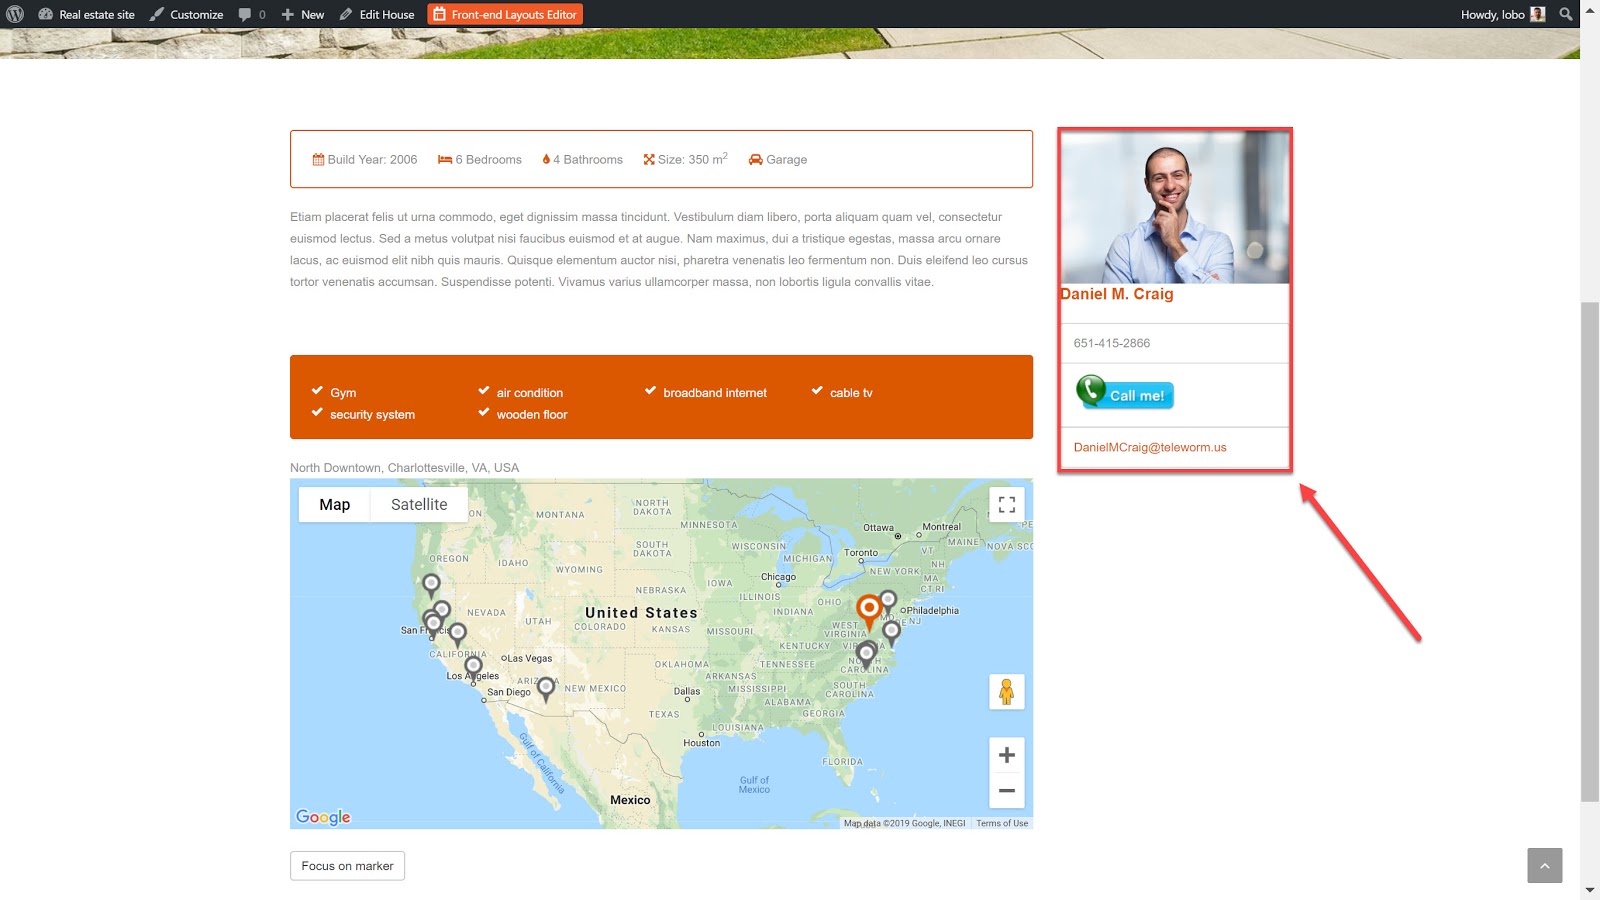
Now that we have added our map and marker it should be ready to view on the front-end. Here is how it looks on my page.
6. How to create post relationships to connect your houses and estate agents custom post types
I also created a cell to display the estate agent who is in charge of the property on each page. The easiest way to do this is by creating a post-relationship.
Post relationships are the best way to link content with each other to avoid duplicating anything. Furthermore, you only need to edit a piece of information once for the changes to appear wherever it appears on the front-end.
Below I’ll show you how I created a post-relationship between my houses and estate agents.
Create the post-relationship between houses and estate agents
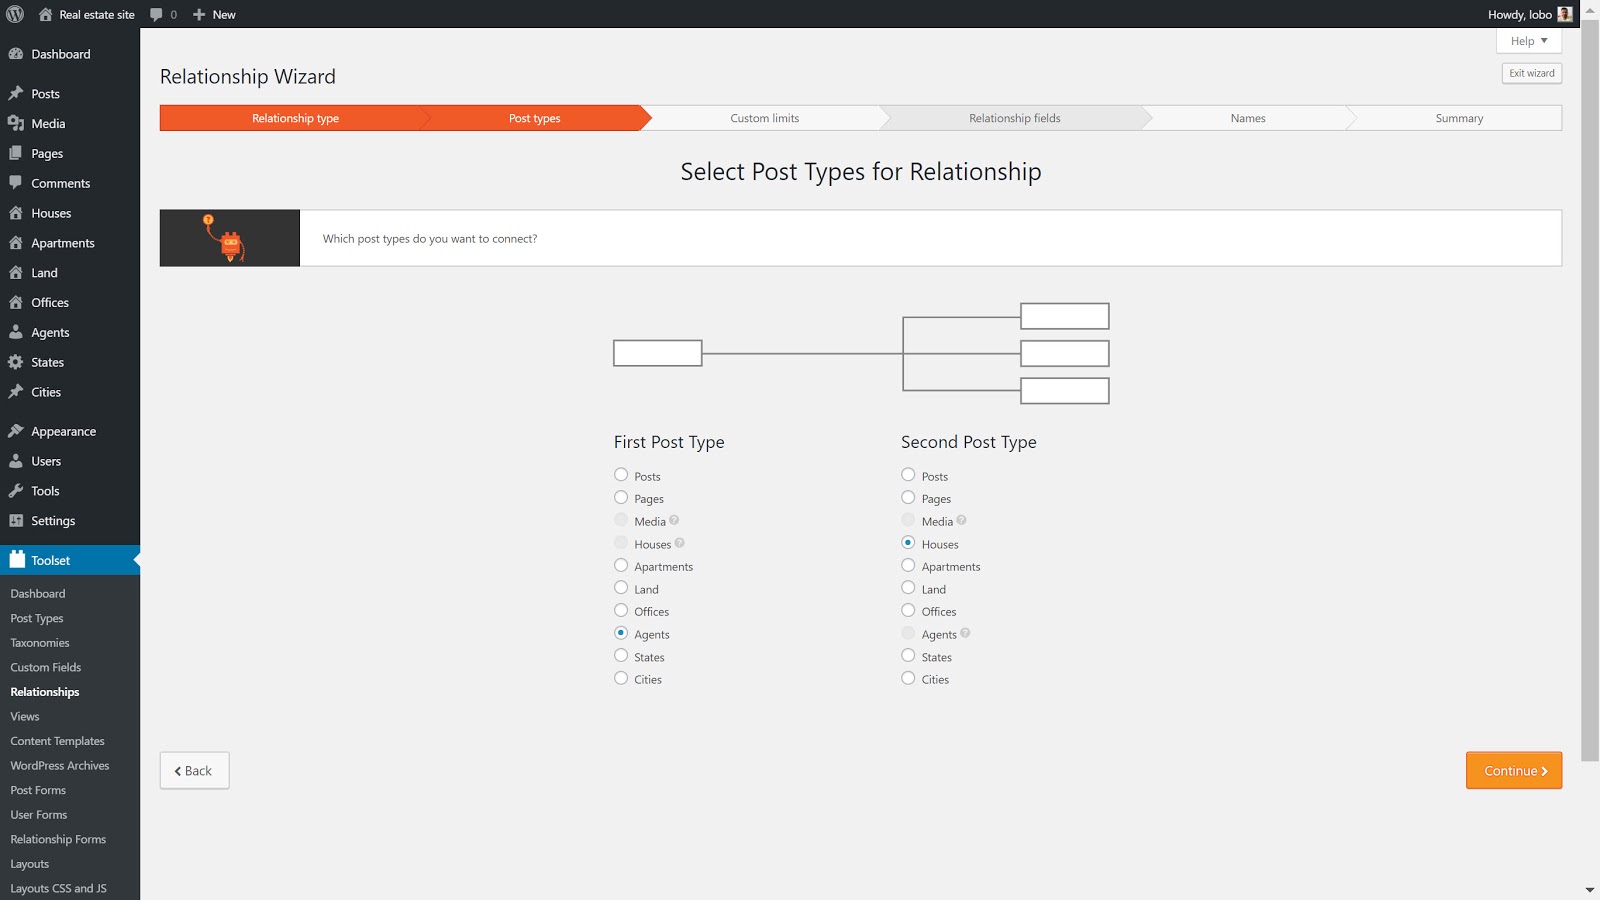
- Go to Toolset -> Relationships and click Add New.
- The Toolset Relationship Wizard opens up. Select the “One to many relationship” as we only want one agent linked to each house. However, we will want multiple houses linked to one agent. Click Continue.
- Select the posts which will form the basis of the relationship. Below I want the “Agents” to be the single post in the relationship and the “Houses” to be multiple. Click Continue.
4. Decide if you want to limit the number of houses which can be assigned to one estate agent. Click Continue.
5. Name your post-relationship. Click Continue.
6. Review your post-relationship and click Finish.
Connect your houses and estate agents
Below we’ll create a connection between a house and an estate agent.
- Go to a houses post type and start editing it.
- Towards the bottom, you will see a new section called agent_house. Click Connect existing agent and you can choose which agent you want to be in charge of the property.
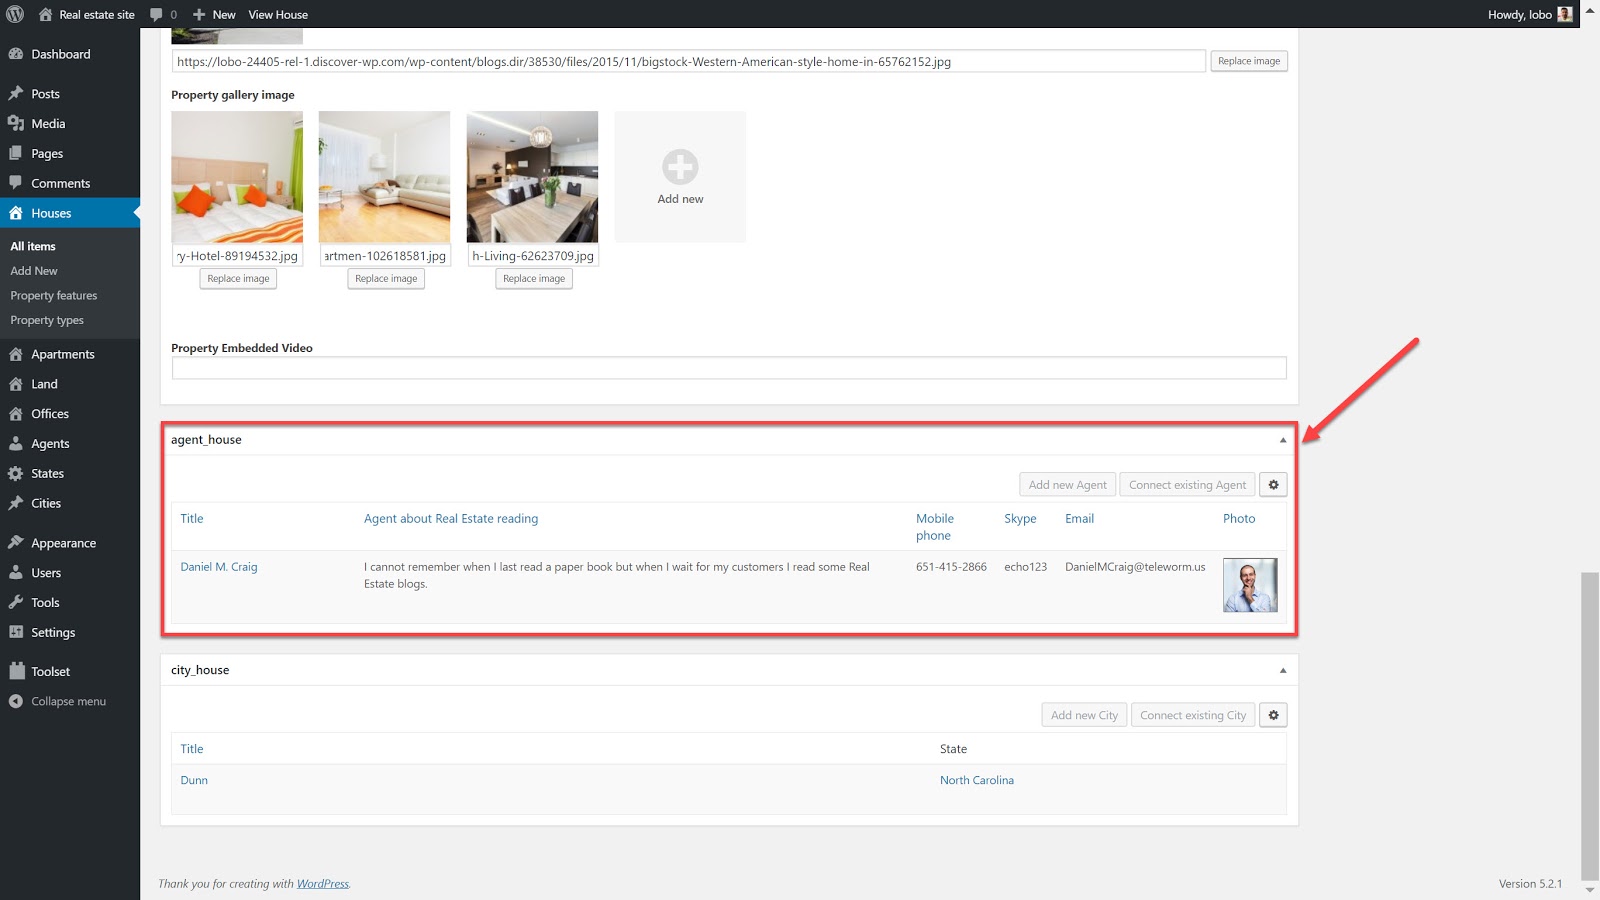
3. Click update and save your post.
Display your post-relationship
Once we have created our connection we can display them on the front-end.
Once again, we’ll use the template we previously created for our individual properties.
- As before, we need to add a cell where we will display our estate agent.
- Click Fields and Views and search for your post-relationship. Click Insert shortcode and your relationship will be displayed on the front-end.
7. Create a search to help users find properties
The easiest way for your users to find the best property for them is with a robust search engine on your real estate website.
When you add multiple filters to your search, users will be able to easily narrow down their choices by adding their preferences.
Create the search
- Go to Toolset -> Layouts and click Add New.
- Create your cell just like in previous features and add the cell called View content lists, custom searches, custom sliders.
- Select Display the results using a custom search and click Create view.
- Under Content selection, select which post type you want to search.
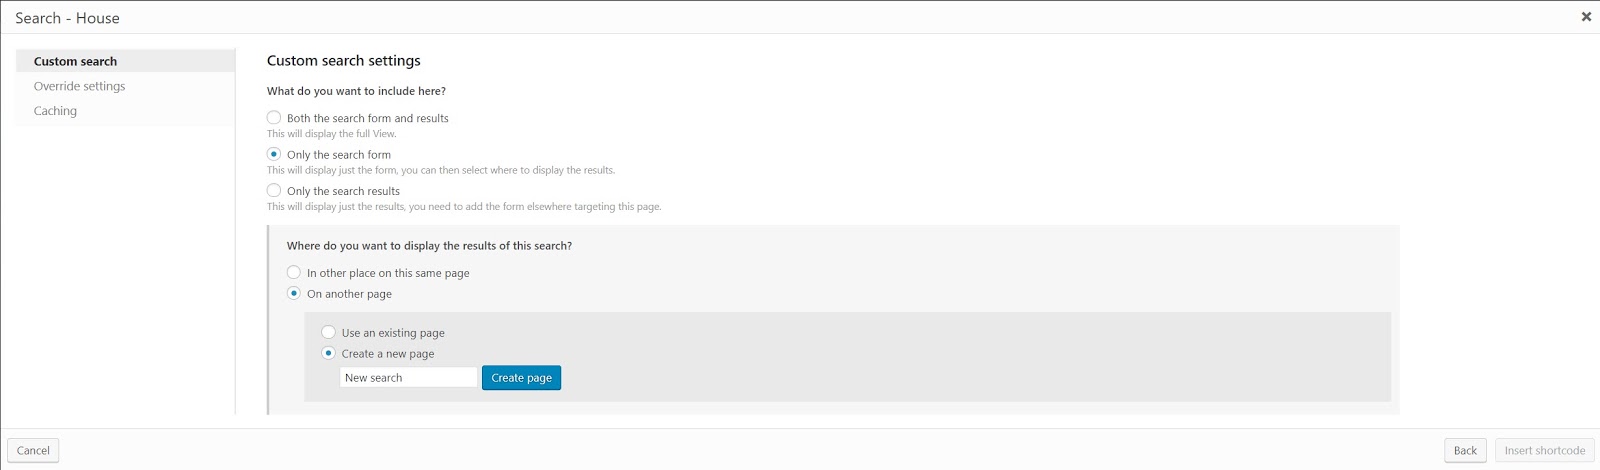
- In Custom search settings choose how you want results to be updated. For example, AJAX updating will load the results without refreshing the page.
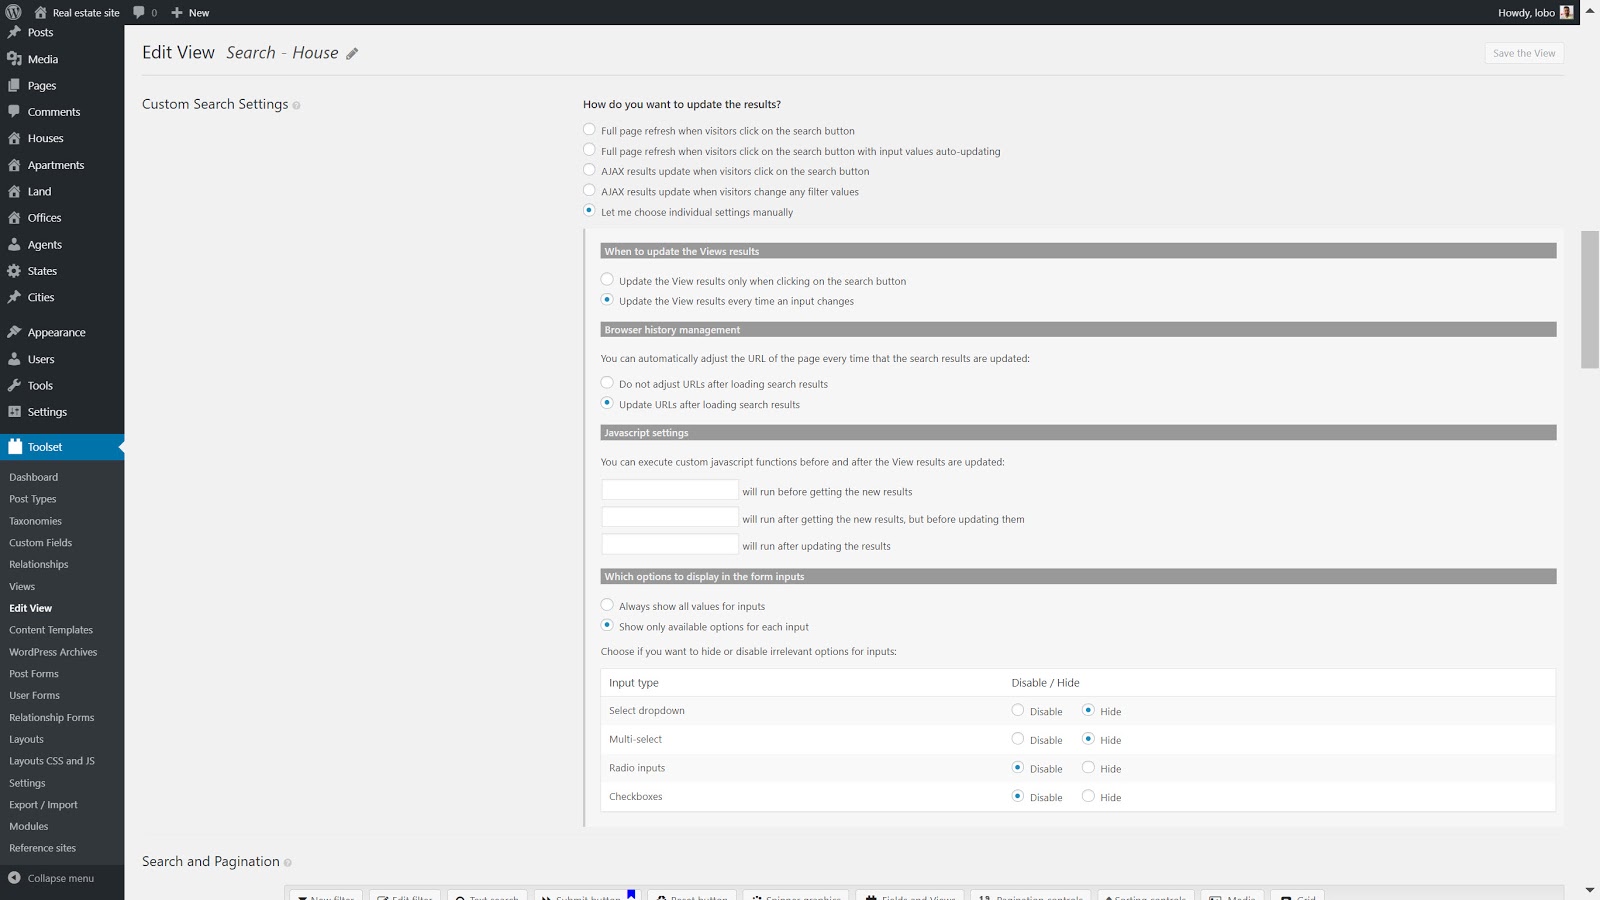
- In Search and pagination pick the filters you want for your search.
- As well as picking the filters you can add other features such as a Reset button to reset the search.
- Style the search if needed under the CSS editor and JSS editor sections.
Style your search results
There are multiple ways you can display your search results including as lists or grids.
- On the same page that you created your search, head to Loop Editor and click Loop Wizard to start editing.
- Choose which way you want to display your results. Mine will be with the Boostrap grid.
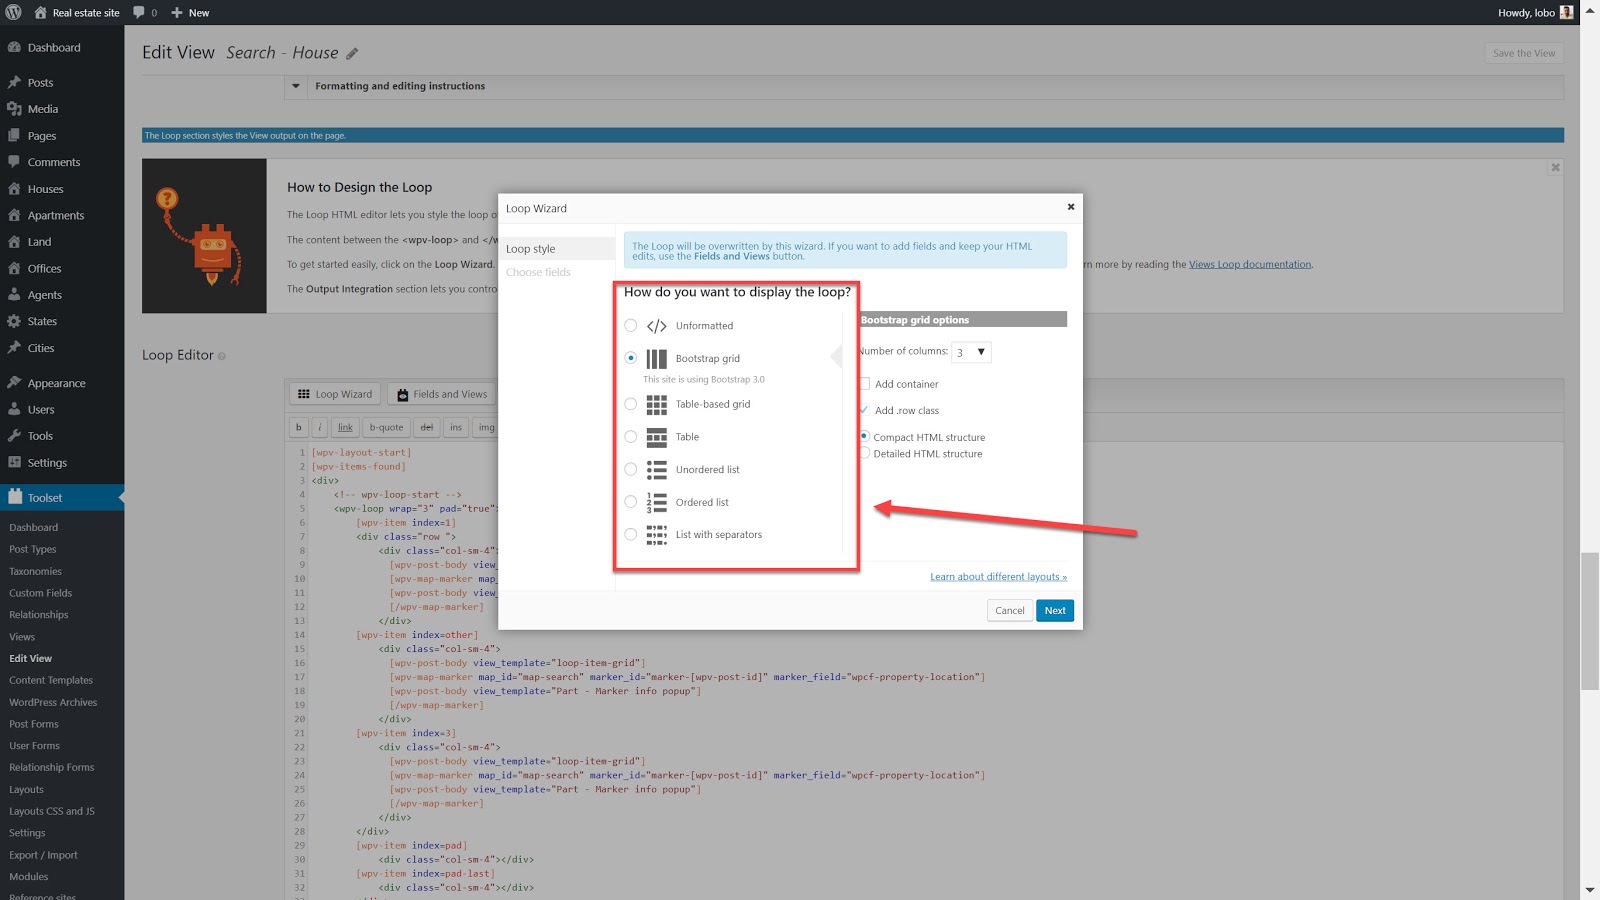
3. Click Finish and you will see your fields in the Loop Editor.
4. Click Save View at the bottom of the page.
5. Click Save and your results are ready to be displayed.
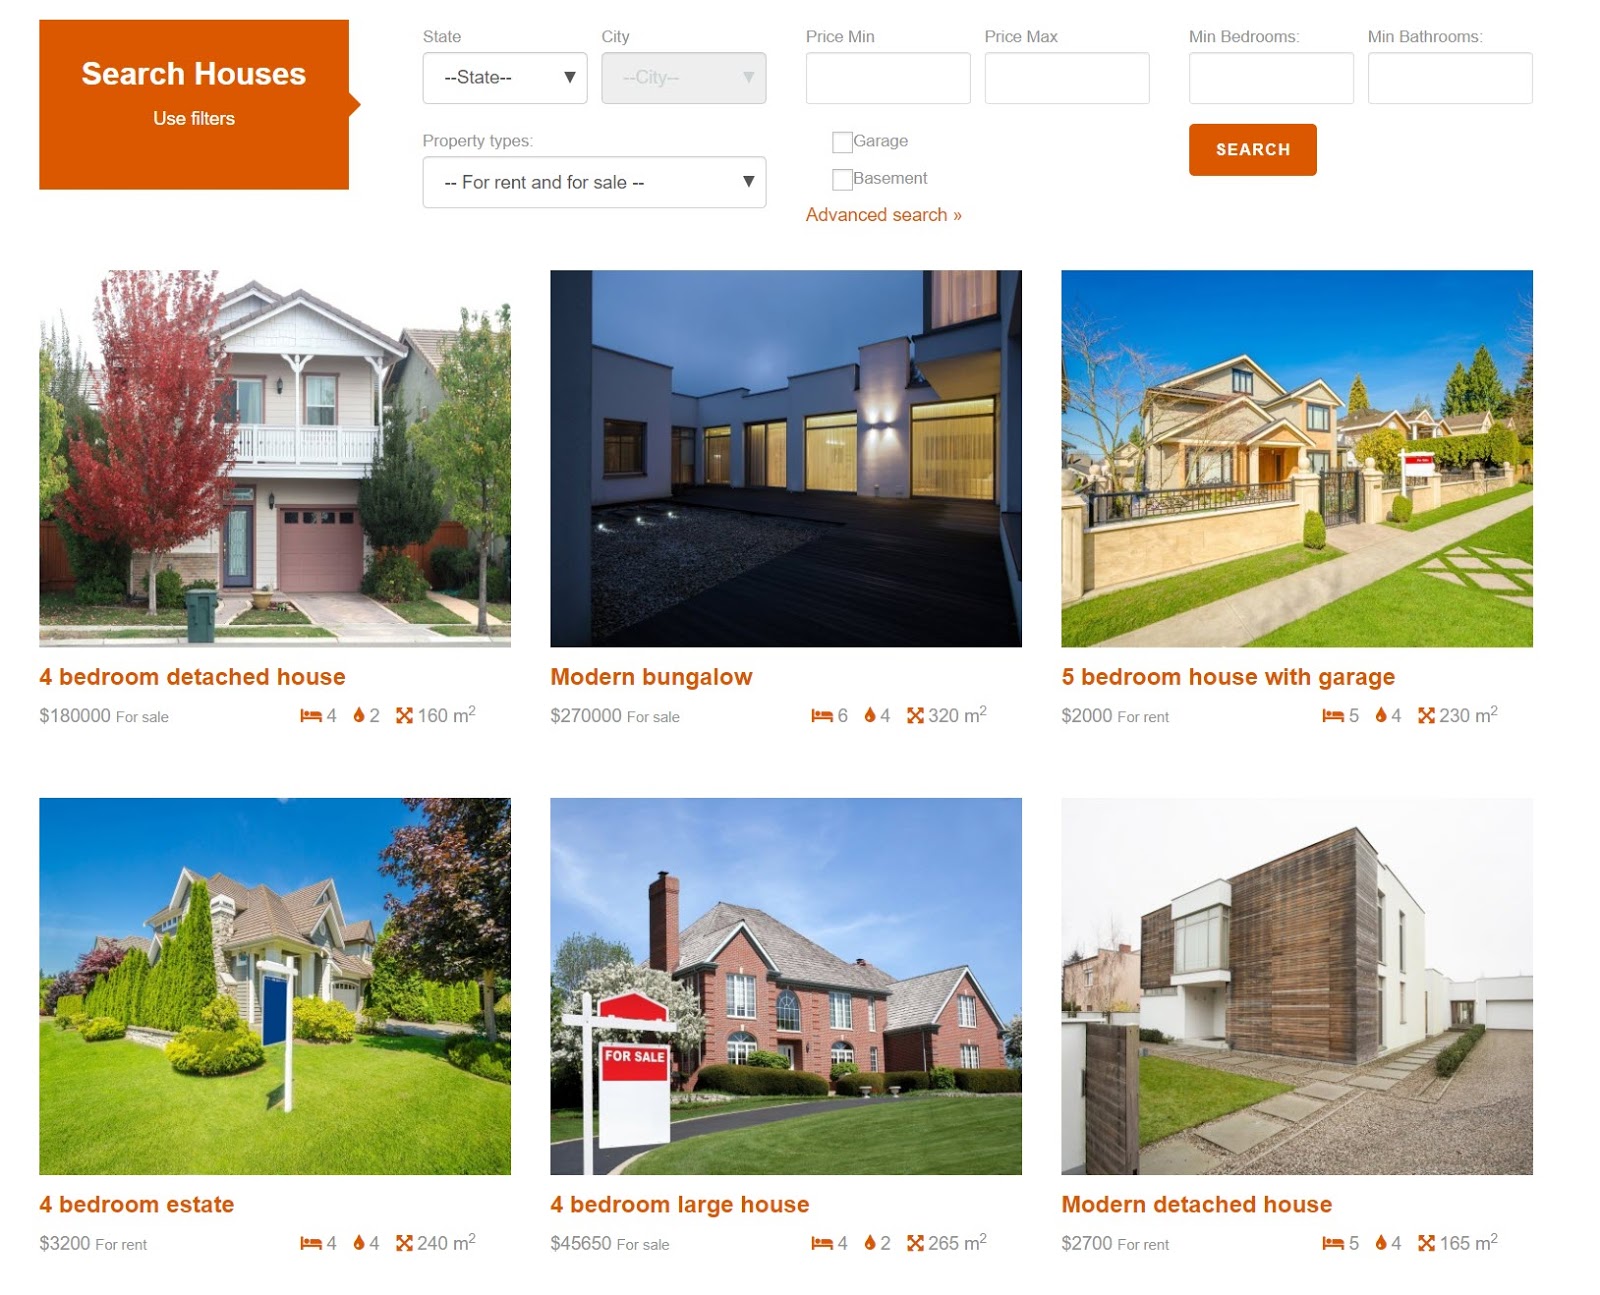
Display your search on the front-end
- Head to the page or layout where you want your search to appear and select Fields and Views.
- Select the View for the search you just created.
- Choose whether you want just the search form or the search results as well on the same page. Below I have them on separate pages.
- Click save and it will be on the front-end.
8. Create a slider to display multiple images of properties
One of the easiest ways for your users to see multiple properties in as little time as possible is through a slider.
A slider will show off the breadth of the properties in your portfolio. Furthermore, you can also display sliders on your single property pages with different images of each of the rooms in a house.
Here’s how I created a slider for my homepage to display different houses.
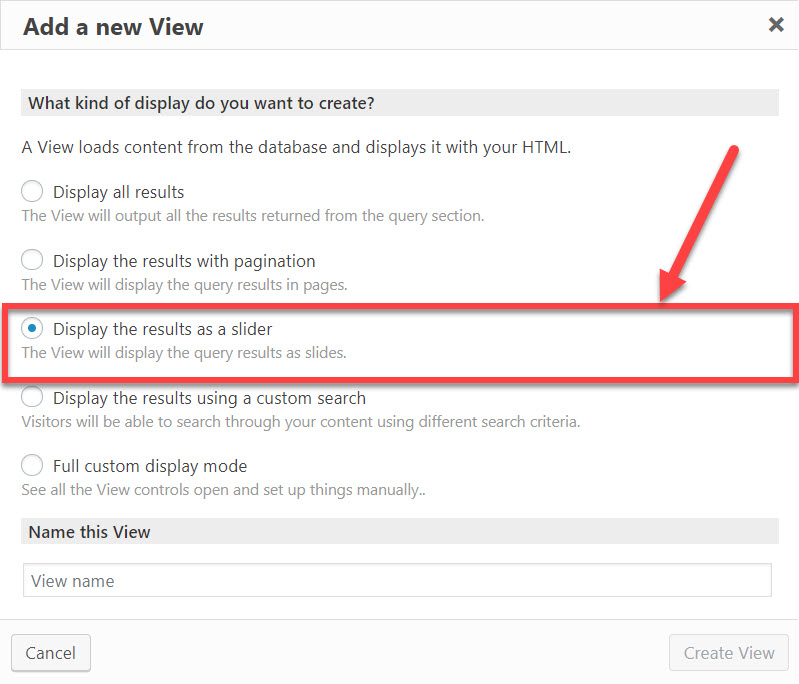
- Head to Toolset->Views and click Add New.
- Select Display the results as a slider.
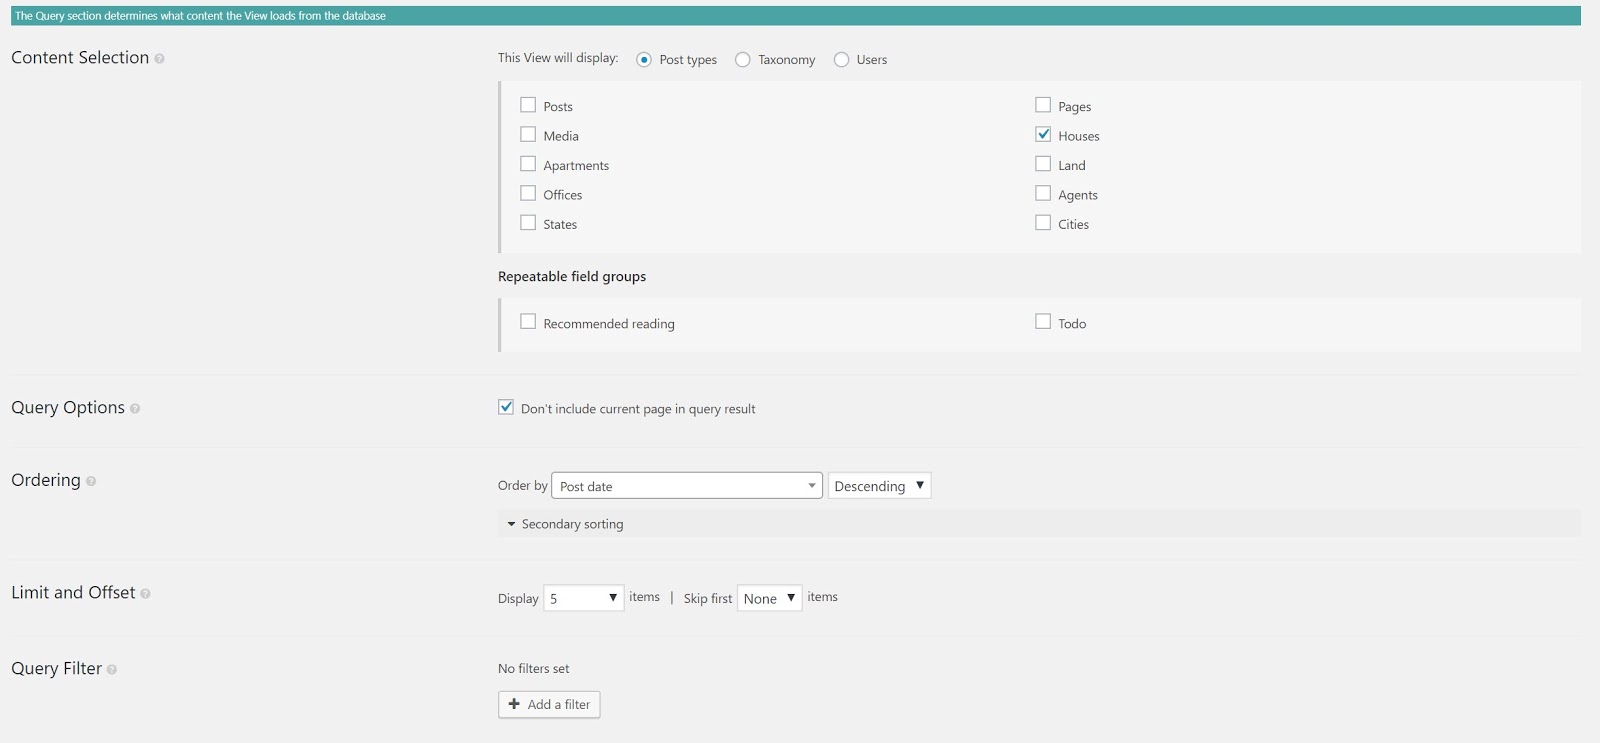
3. Under the Query section choose the type of content you want to display. In this case, we want to display our houses. We can also select how many images we have and any query we want to input so that we only see certain properties which match our criteria.
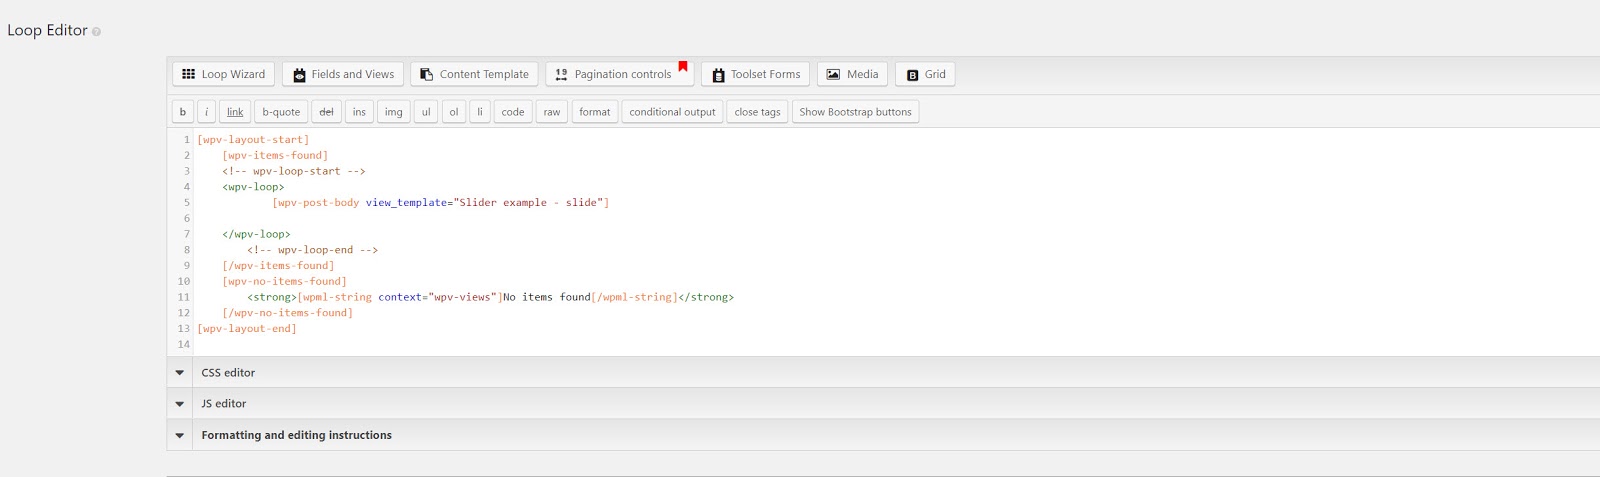
4. Now that we have established the content we need to design the slider. Under the Loop Editor select Fields and Views and choose which fields you want to add in your slider. For example, in our slider for the homepage, we want the post title, price and whether it is for sale or rent.
5. Add any further styling you might want under the CSS editor and JS editor.
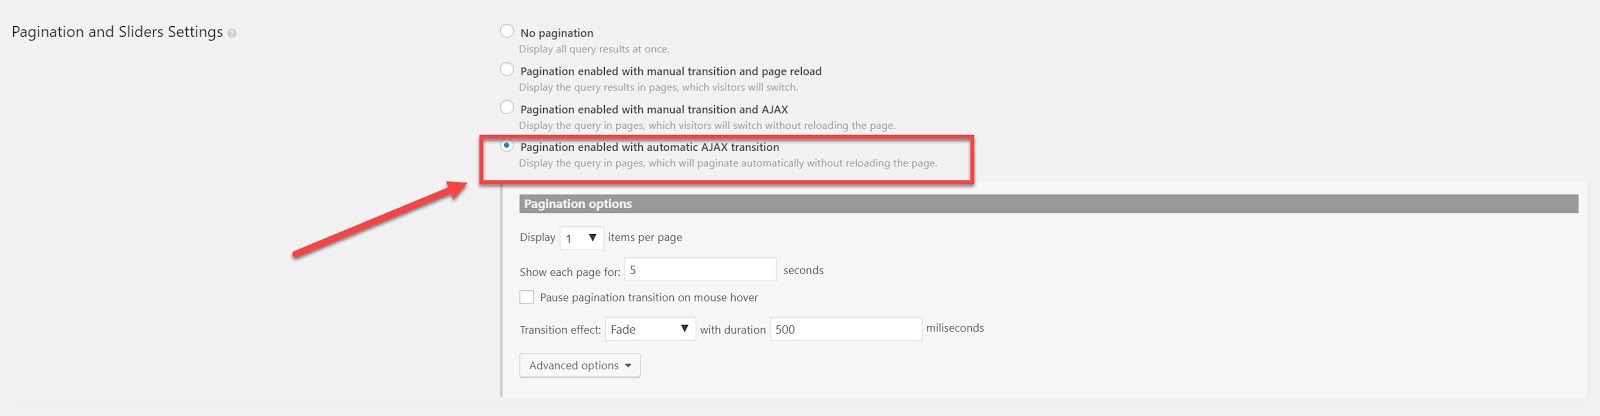
6. Finally for the design, we need to select what type of transition we want between each slide. For this one I’ve selected Pagination enabled with automatic AJAX transition. There are, however, other options which are worth experimenting with.
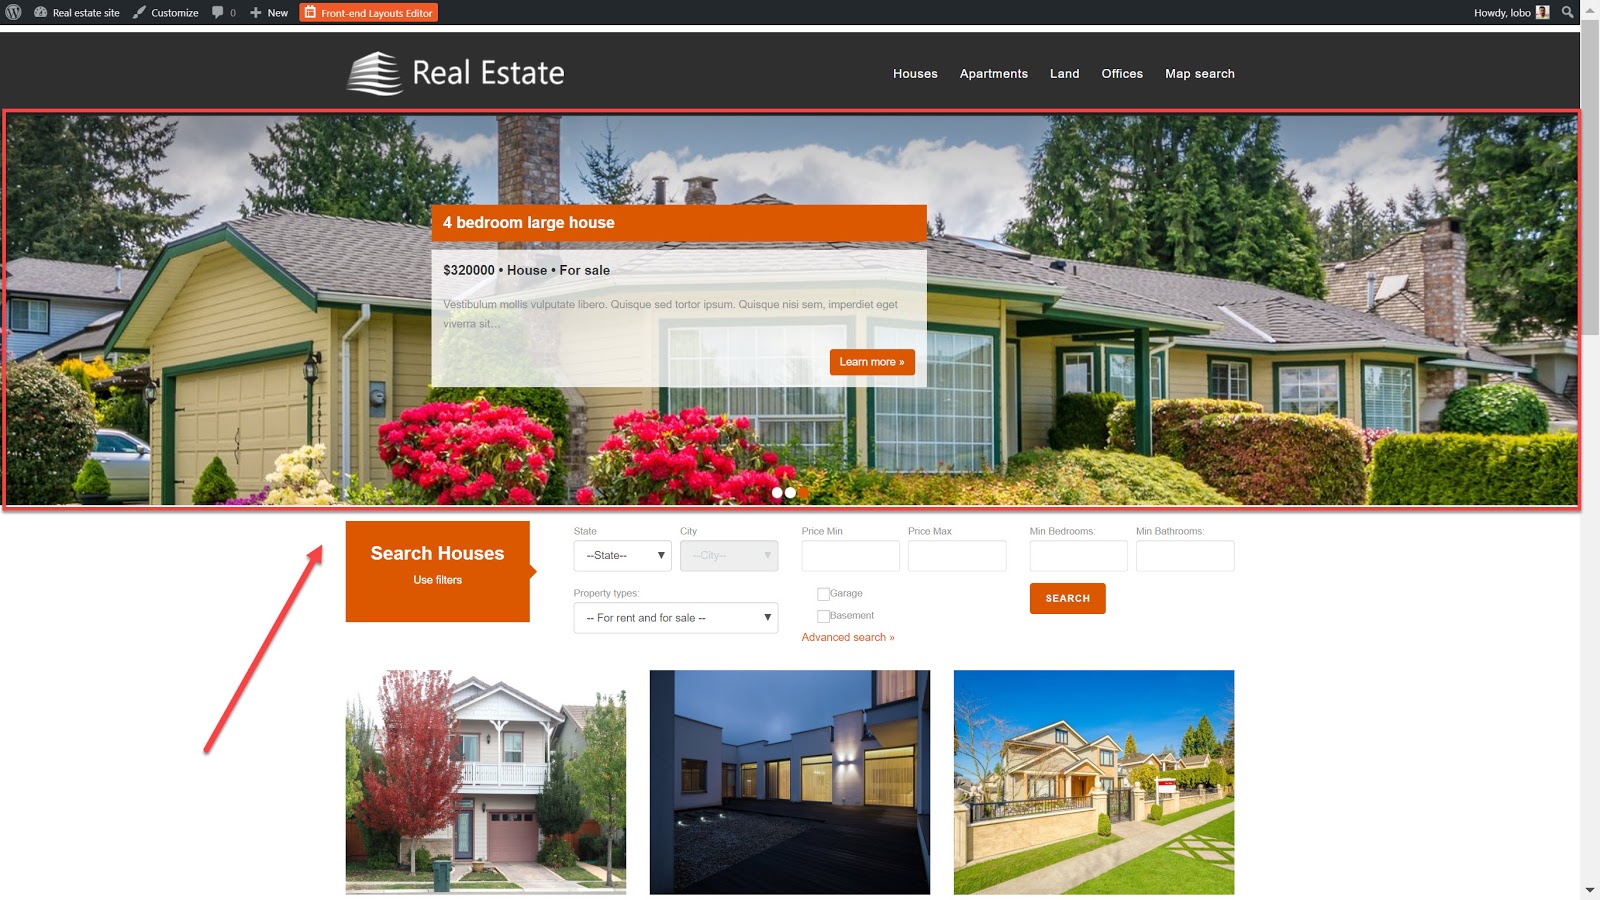
7. Finally, we can add the slider to one of the pages. Head to the View or Layout in which you want to add it then insert the shortcode.
Below is how our slider looks on the homepage.
9. Create a front-end form to make it easy for users to add their listings
As your real estate website becomes more and more popular you will see more users who will want to list their own properties on your website.
Rather than asking them to email you with all the details for you to upload them, you can simply ask them to fill out a form which will automatically create the listing.
I used Toolset’s drag and drop editor to create it. Below are the steps.
- Head to Toolset -> Post Forms and click Add New.
- You will now be in the Forms wizard, click Continue.
- Name your form and click Continue.
- Set for which custom post type you want to create listings for, what happens to the listing when it’s submitted and where users are taken to when they submit the form. Click Continue.
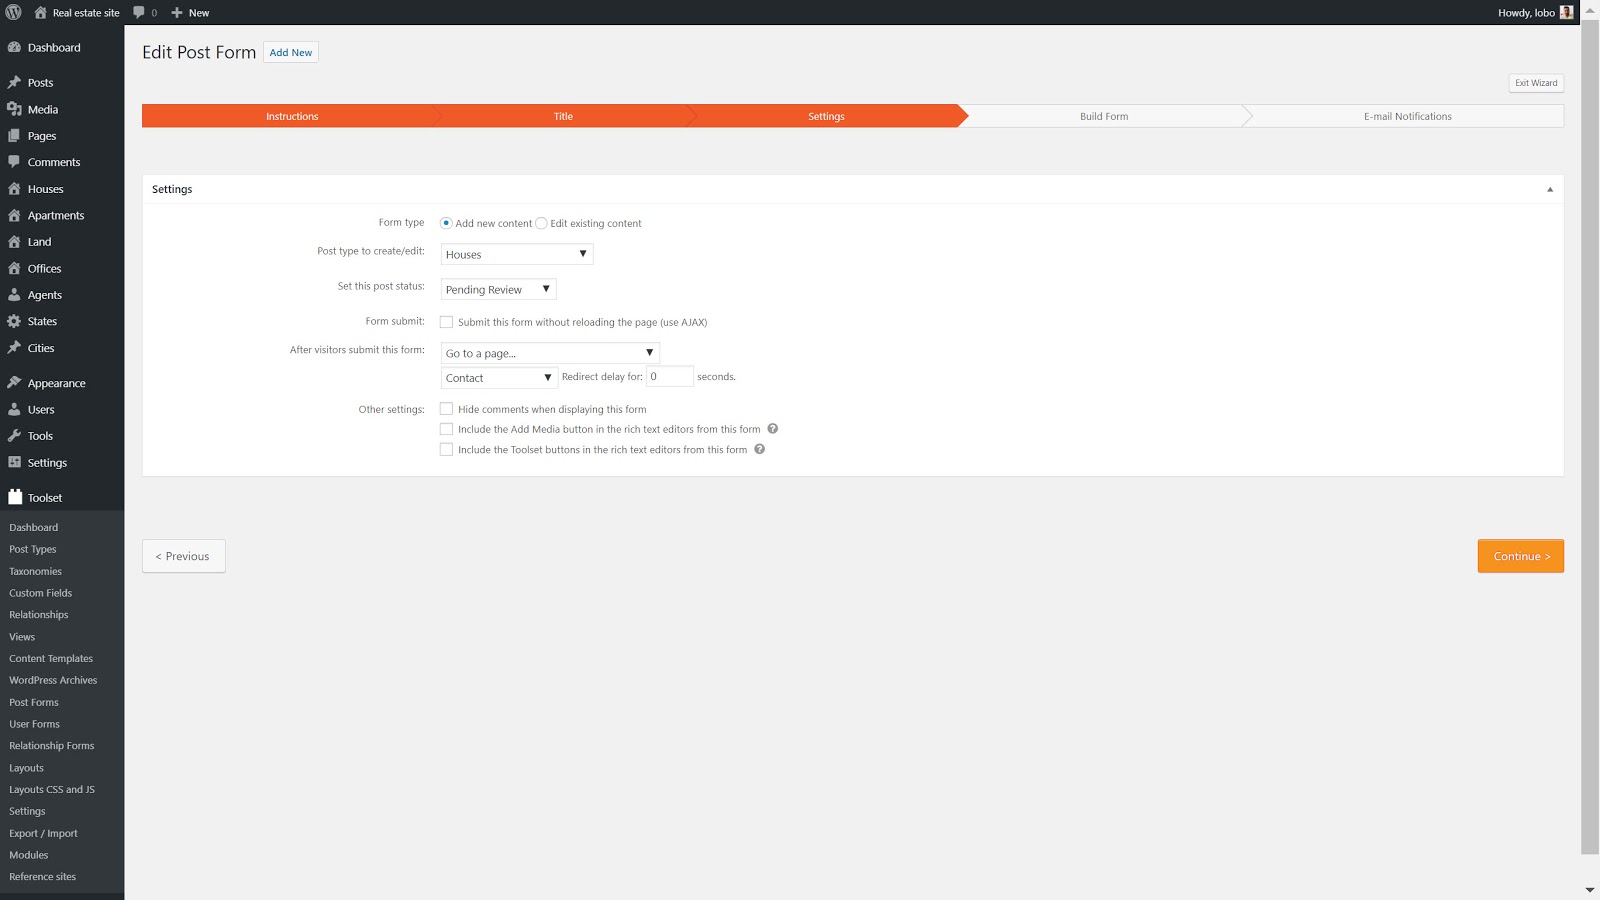
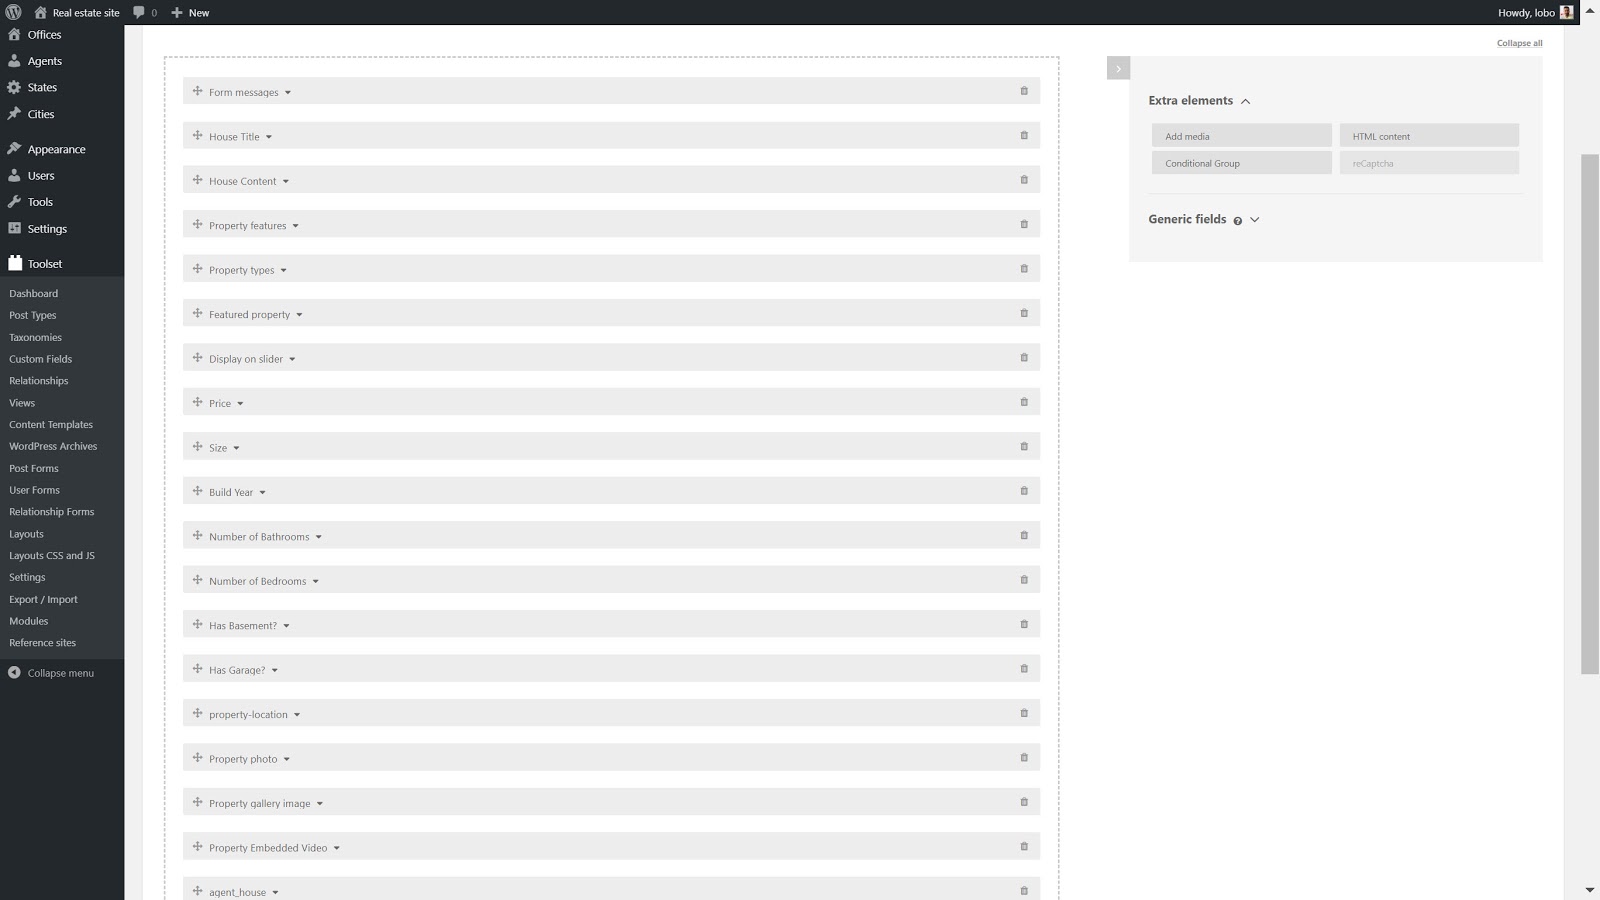
5. Now you’re at the drag and drop editor where you can decide what fields you want and where they should go. You can position the fields based on where you want them, choose to remove some and also to add extra elements if required. Click Continue.
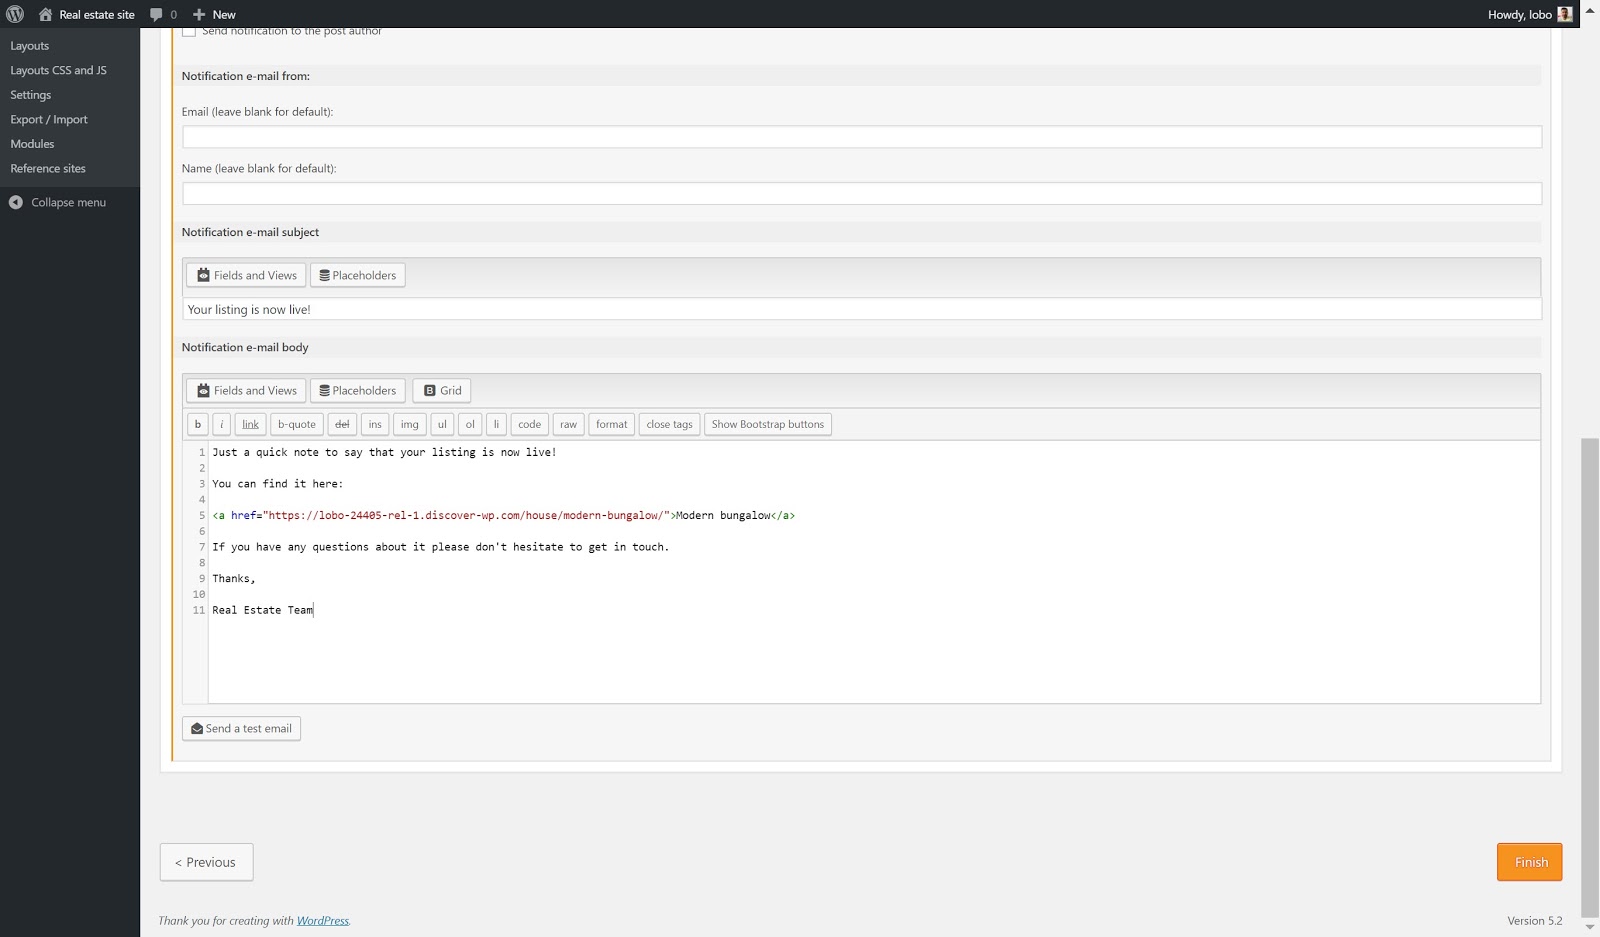
6. Finally, you can add email notifications for users or editors to keep them updated about submitted forms. Below I created one to send to users who have submitted a listing to tell them their post will be reviewed before publishing,
7. Click Finish.
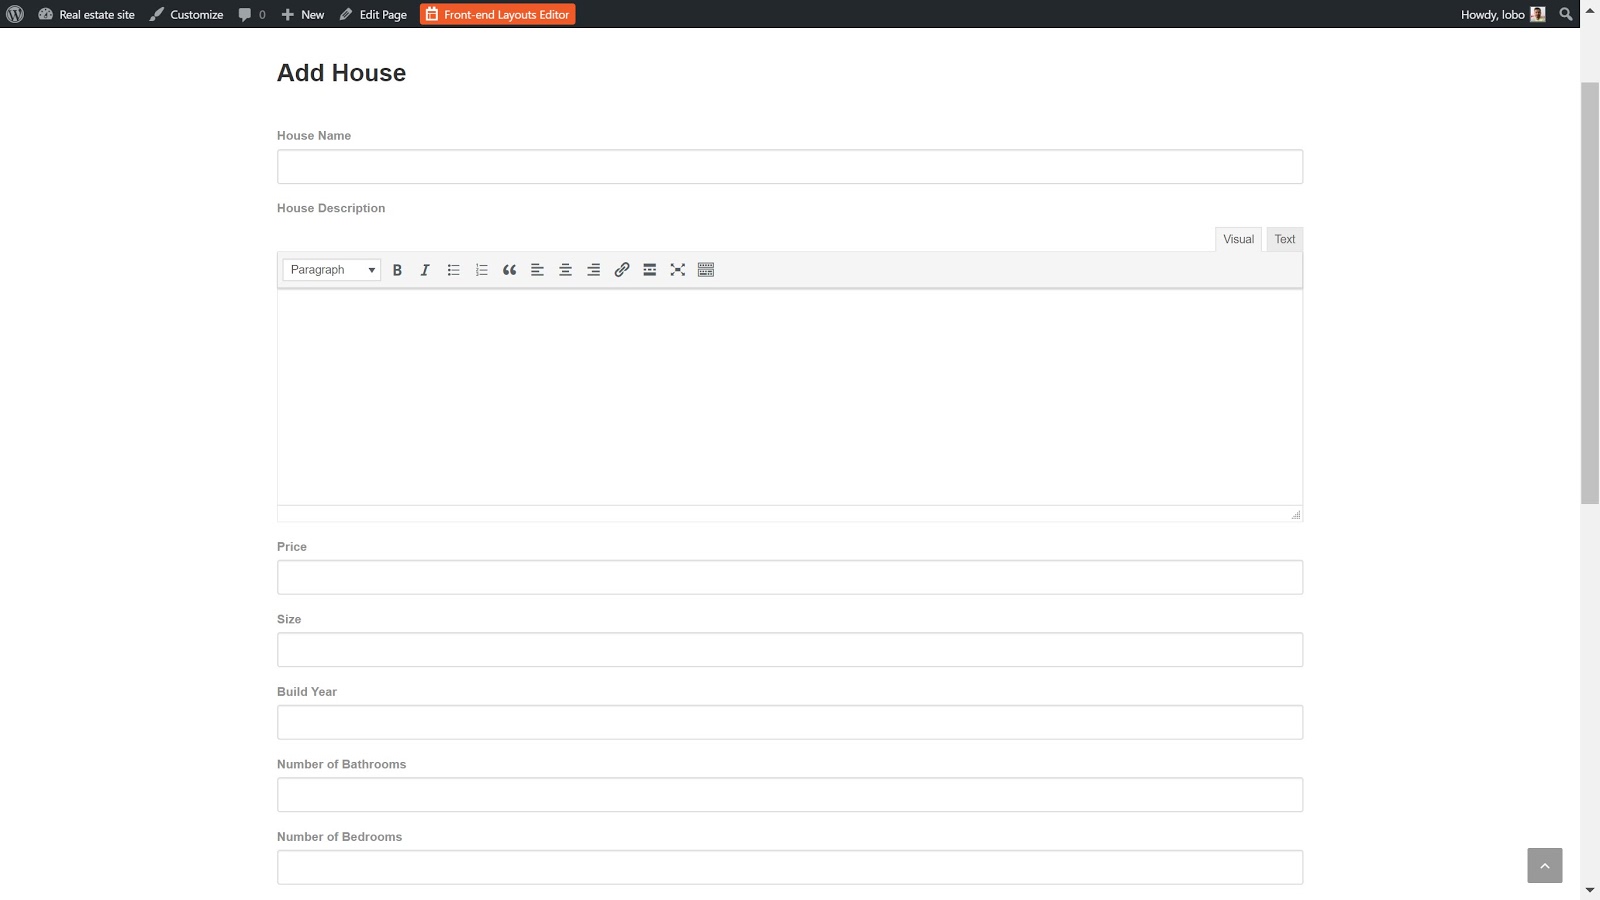
8. Now we can display the form on the front-end. Just like with our previous features, we can head to the relevant template and select Fields and Views and finally select the form to display it.
Let us know your experiences of building real estate websites!
Given the number of features it needs, real estate websites have been notoriously tricky to build in the past. Not only can many of the features be fiddly but developers might have used a number of different plugins which affected the website’s performance.
By following these steps you’ll be able to not only build a real estate website easily but also ensure that it performs to your users’ expectations.
What have your experiences been of building a real estate website? Let us know in the comments below!
Joe Lobo
Joe Lobo is a content creator for Toolset and WPML. He enjoys exploring WordPress when he is online and countries while offline. He can be contacted on Twitter.
The post How to Build a Real Estate Website on WordPress appeared first on Torque.
