Merely having a website as a freelancer is not nearly enough. If you want to be taken more seriously and command higher rates from customers and prospective clients, then you should really think of building a freelancing portfolio online; one that stands out.
When it comes to building a freelance portfolio, two things are the most important: The layout design, and the content, in that order. In fact, statistics have shown that visual presentation of content might just be more important than the content itself.
So much for ‘don’t judge a book by its cover’.
You will definitely get more clients as a freelancer if you have a portfolio and your numbers will most likely triple if it’s dynamic and professional looking. A lot of freelancers already know the importance of having an online portfolio and some of them have opted for portfolio themed sites. Some others are making do with external platforms like contently and even Pinterest. These are by no means bad choices, but building a professional and dynamic portfolio on your WordPress website is a perfect choice.
Too many freelancers shy away from this option because of cost and technicality reasons. But you can create the perfect portfolio on your website, using a free WordPress Plugin, and only a few simple steps.
Interestingly, many of your favorite freelancers are already using this portfolio type on their websites.
So if you already have a website and you are considering creating a portfolio page but you don’t intend to change your theme, or you simply want a dynamic and professional looking portfolio that would improve your conversation rate, then follow these simple steps:
Step #1: Sign up for a free Shrink The Web (STW) account.
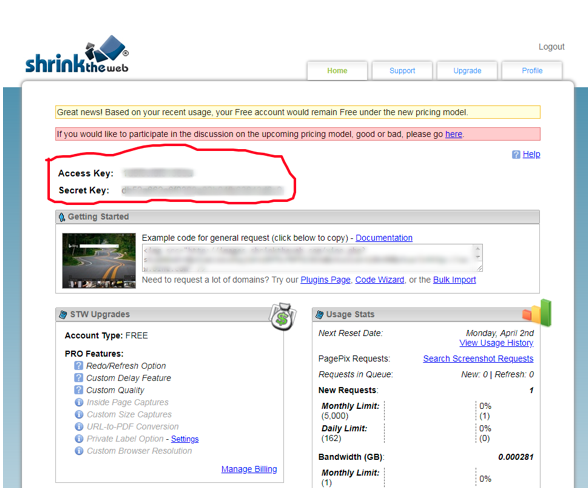
Before you log in to your WordPress dashboard, first arm yourself with your STW secret and access keys. You need these keys to be able to enjoy the full features of the WordPress portfolio plugin.
How do you get your keys?
Register for a Shrink The Web account (free or premium type). The free account would do the job just fine so you don’t need to spend a penny. After successfully signing up, login to your STW dashboard and located your secret key and access key. You should find these keys just as you login. Copy them, you will need them later.
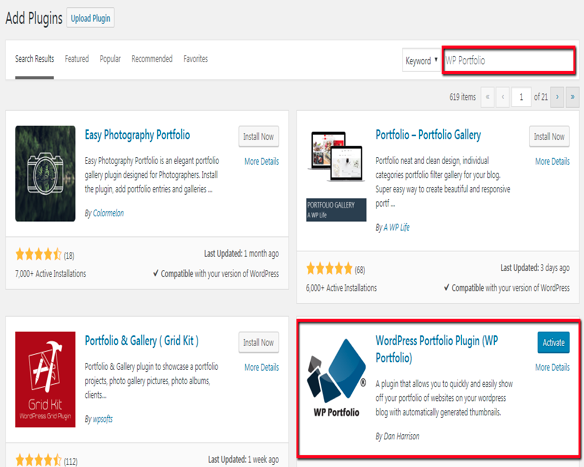
Step #2: Install and activate WP-Portfolio
Now that you have the STW secret and access keys, login to your WordPress dashboard and click on Plugins > Add new. Then type the name of the Plugin ‘WP Portfolio’ into the search box on the top right corner, install and activate it.
Once you have installed and activated the WordPress Plugin, it would appear in the bottom left corner of your dashboard menu.
Step #3: Set up your WP Portfolio
Click on the WP Portfolio on the dashboard to expand the menu, and then click on Portfolio settings.
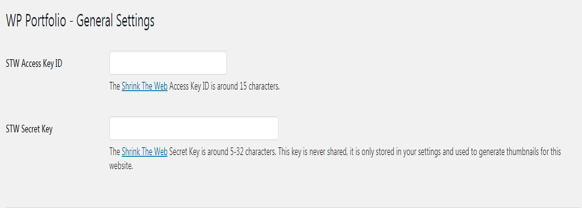
On the first screen you will see, you will be required to enter your Shrink The Web keys which you obtained from Step #1 above.
The STW access key ID is usually around 15 alphanumerical characters while the STW secret key is not more than 35 alphanumerical characters.
On the same first screen, you can go ahead to configure your thumbnail settings.
For your STW rendering type you have two options:
- Render as embedded, or
- Cache locally on your server.
The recommended option is to cache locally on your server but be sure that you are not using the same Shrink The Web details that have been used by another user.
You can change the other settings like thumbnail size, number of days to cache thumbnails, custom thumbnail settings and the miscellaneous settings to the liking, but the default settings for these would work just fine.
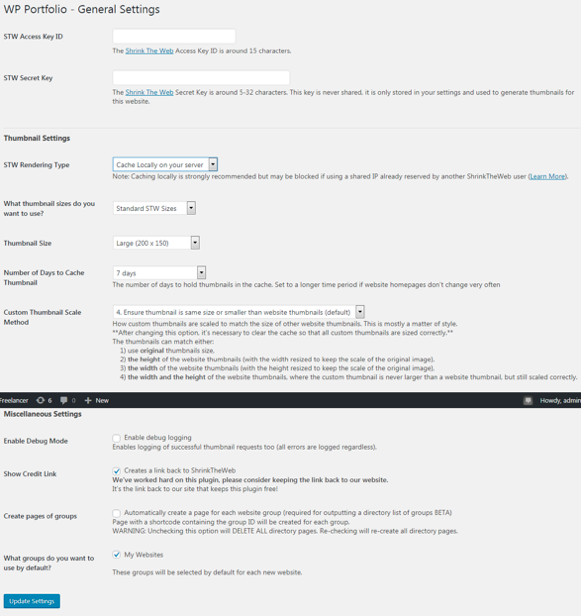
After updating your portfolio settings, click on Layout settings and configure to your liking, then update your settings.
Step #4: Add to your portfolio
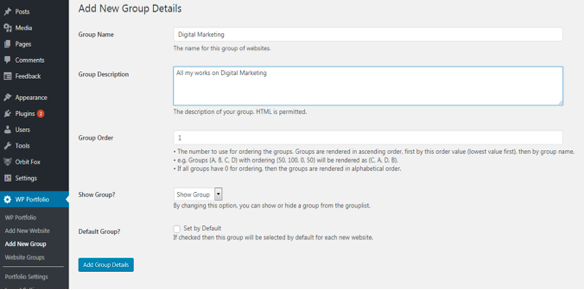
After configuring your portfolio settings, the next step is to add your works to the portfolio. Click on Add New Groups on your WP Portfolio menu to create categories for your works. Enter the name of the group, the description and the order in which you want it to appear.
For example, if you do WordPress and digital marketing services and you want your works on Digital marketing works to appear first, enter the group name as ‘Digital marketing’, fill the description (or not), and enter ‘1’ as the group order.
This means that your next group would be named as ‘WordPress’ and given the order ‘2’.
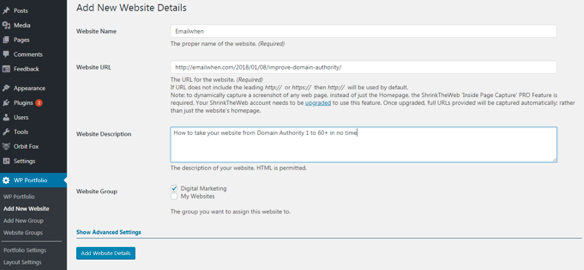
After adding your groups, click on Add new websites to start adding the websites where your works are located, to the various groups.
Enter the name of the website, the link to your work, and in the description tab, enter the title of the work (with a description if you want). Then tick the group you want your work to appear on. Do this for as many sites as your works are on.
If you have done everything right, you should be able to preview it when you click WP Portfolio on your dashboard.
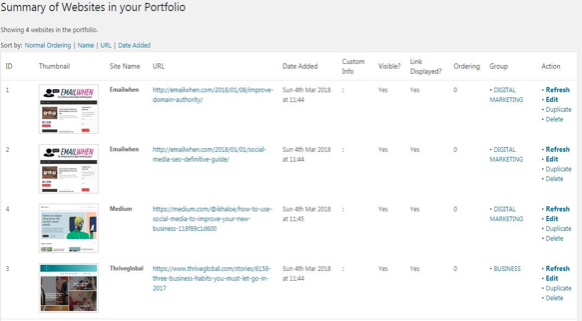
You will notice that the thumbnail images are not images of the exact blog posts, but a screenshot of the websites where the blog posts are featured. Although this isn’t bad, wouldn’t it be way cooler if your blog post images show instead?
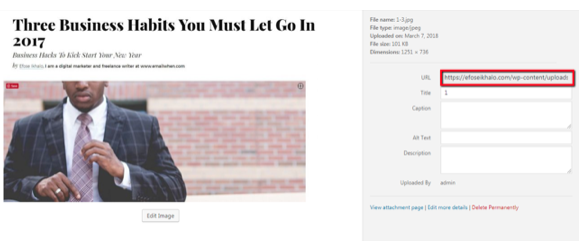
To change the thumbnail images to the exact image of an individual blog post, open the blog post from the site where it is posted and take a good screenshot of it showing the post title and featured image.
On your WordPress dashboard, click on Media> Add new and upload the screenshot. Click on edit to open a new screen. Copy the URL at the top right corner of the screen.
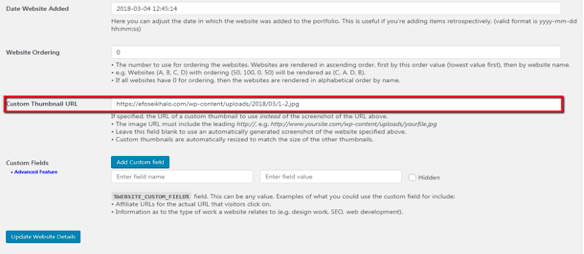
Now go back to your portfolio preview by clicking WP Portfolio on your dashboard. Click on edit for the website whose thumbnail you want to change.

Click on Show Advanced Settings, look for ‘Custom Thumbnail URL’ and paste the URL which you copied earlier there, and update.
Repeat the same process for all the items on your portfolio or whenever you want to add a new entry to your portfolio.
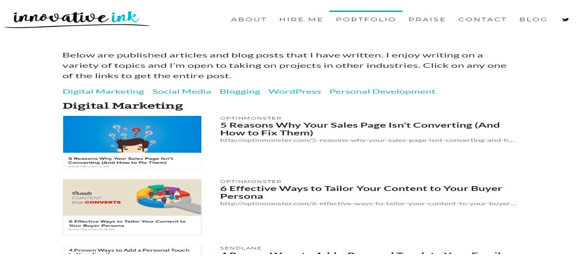
If you have done it right, you portfolio preview should look something like this:
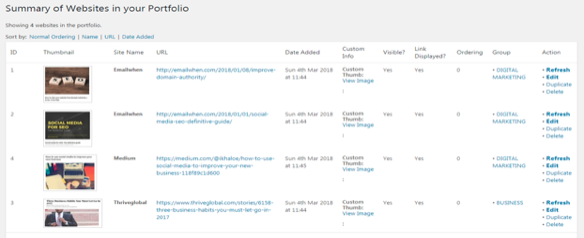
It looks cooler than before right?
Step #5: Display your portfolio
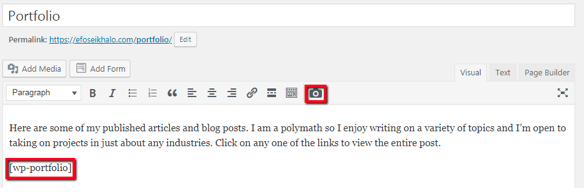
The final step is to show your portfolio on your webpage.
You would want to create a new page and name it ‘Portfolio’. You can add a few texts on the body of the page if you want and then paste this shortcode: [wp-portfolio]
Or click on the portfolio icon on your screen if you want to make a few adjustments to the display, and click Ok. You should get a similar shortcode.
Publish your page.
Congratulations, you have now successfully created your professional looking portfolio. Now you can go out and get noticed by customers and empolyers alike!
Efose Ikhalo
I’m a freelance writer for hire. He is a WordPress enthusiast and also writes about business, tech, and how best to use digital marketing (SEO, social media marketing, content marketing, email marketing and affiliate marketing) to build sales and revenue, drive traffic, create effective awareness and engage with customers.
The post How to Create a Professional-Looking Freelancing Portfolio with WordPress (in 5 steps) appeared first on Torque.
